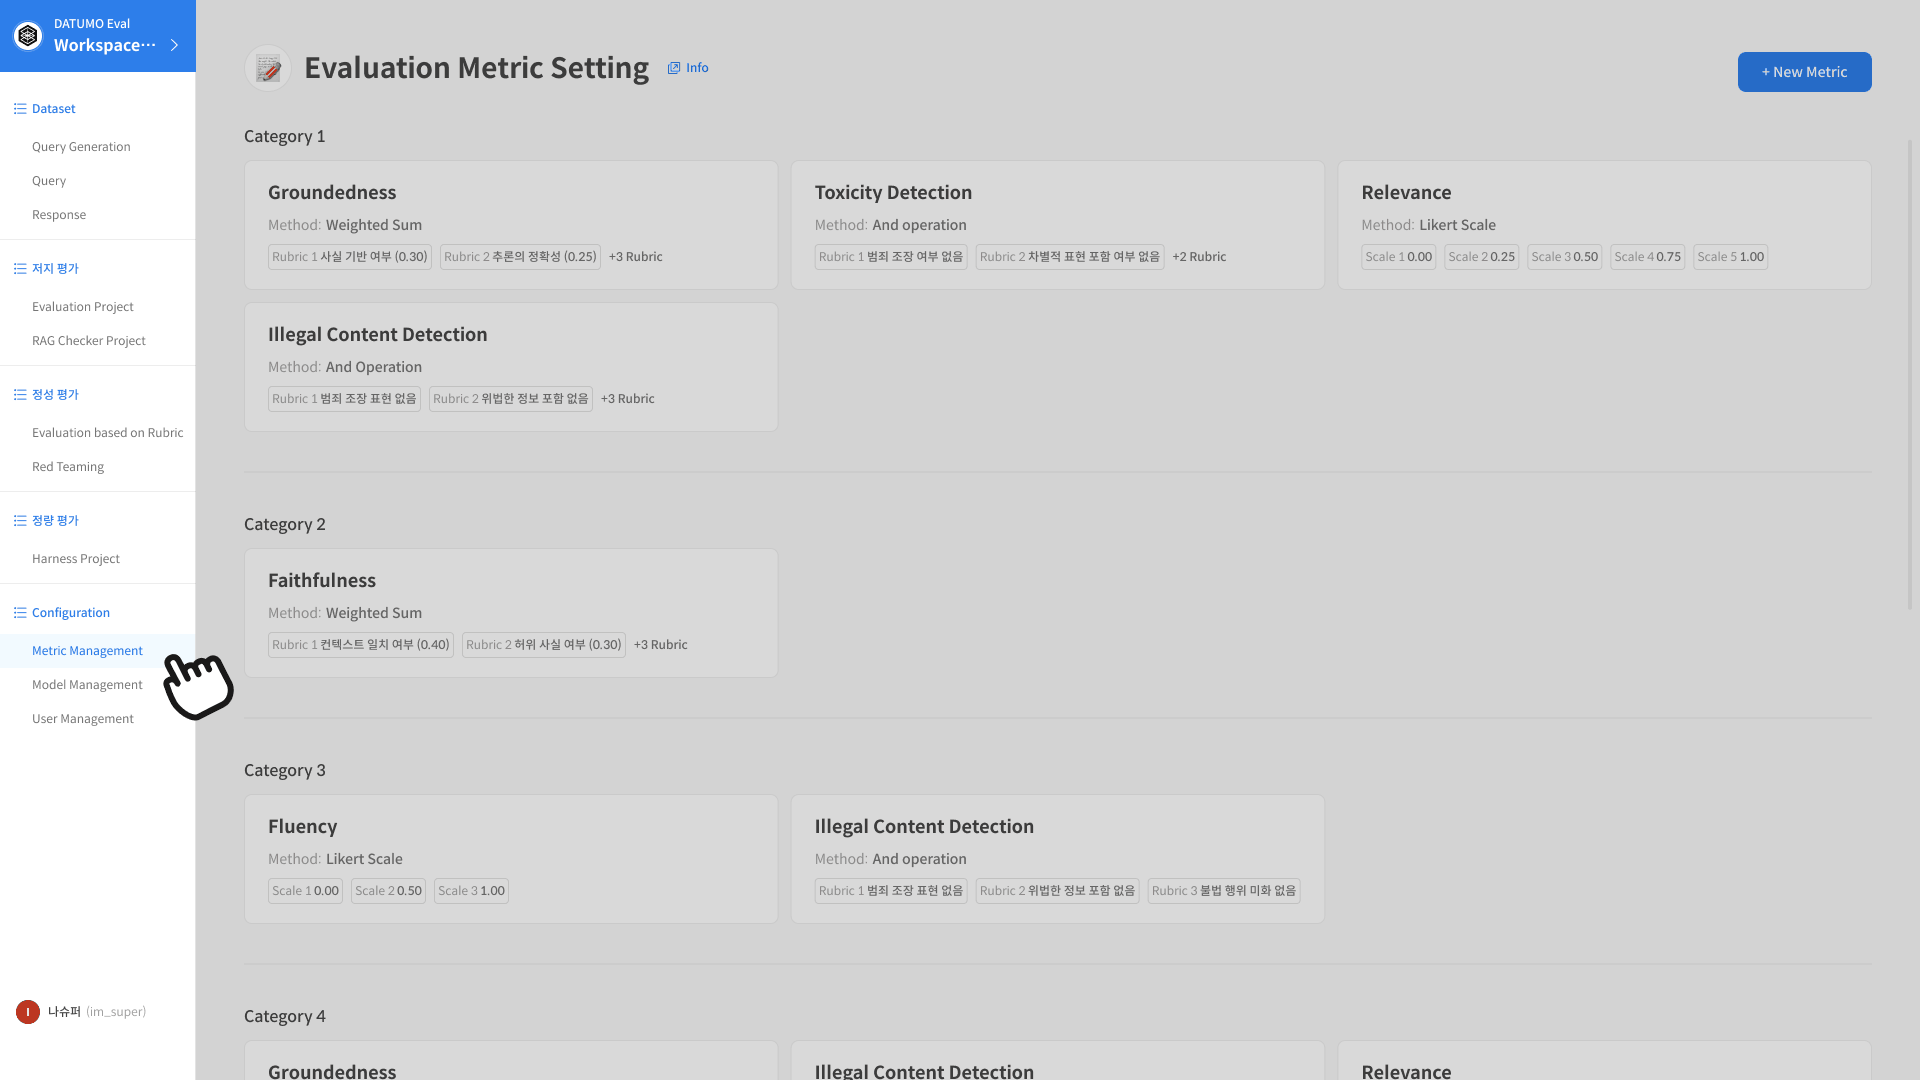
Metric Management
- This feature allows you to create and manage evaluation metrics for use in Evaluation Tasks.
- In addition to default metrics, you can configure custom metrics by defining your own rubrics and prompts.
- You can choose between Likert Scale or G-Eval as the evaluation method depending on your purpose.
Introduction to Metric Management
Metric Management is a feature for managing evaluation metrics used as criteria in Evaluation Tasks. It helps you define custom evaluation criteria based on your service type or domain characteristics, enabling consistent repeated evaluations.
- Metric Creation: Create and save evaluation criteria (rubrics)
- Preview Run Test: Test whether your created metric works correctly
- Custom Prompt Settings (Advanced): Configure System/User Prompts directly
- Metric Management: View created metrics, run previews, delete
In the left navigation, it appears as Evaluation Metric Setting,
and created metrics can be selected and used directly in Datasets and Evaluation Tasks.
Metric Creation (Basic Settings)
1. Create a New Metric
In addition to the default metrics provided by Datumo Eval, you can create new metrics tailored to your service or domain needs. In basic settings, you configure evaluation metrics centered on rubrics (Scale), which can then be used directly in Evaluation Tasks.
① Access the Menu
Navigate to the Metric Management menu from the left navigation.
② Click [+ New Metric]
Start creating a new metric. Clicking the button opens the metric creation modal.
③ Select Evaluation Method
Select the evaluation method for the metric in the modal. After selection, you'll proceed to the creation screen.
- Likert Scale: A method that uses fixed scales like 1~n directly as scores
- G-Eval: A method that calculates the final score based on expected value using the scores (1~n) returned by the model and their probabilities
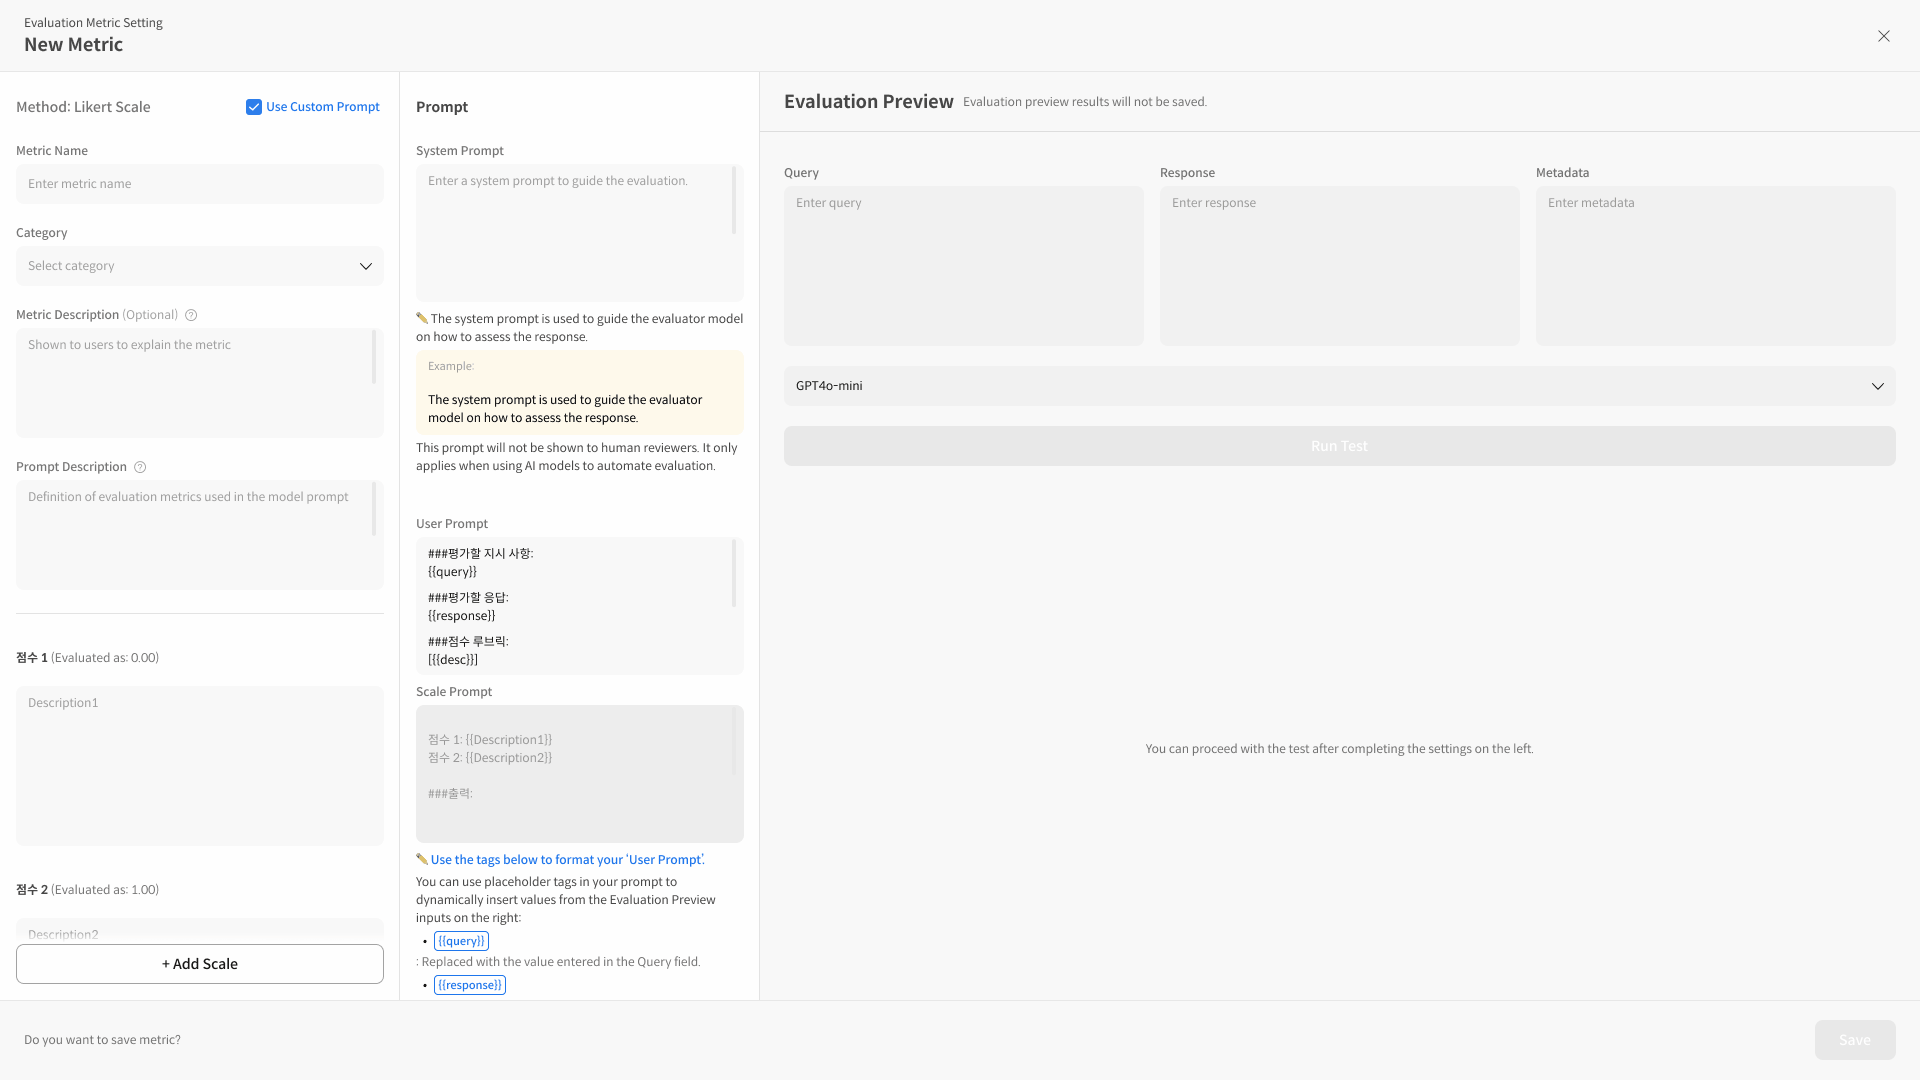
2. Rubric (Scale) Configuration
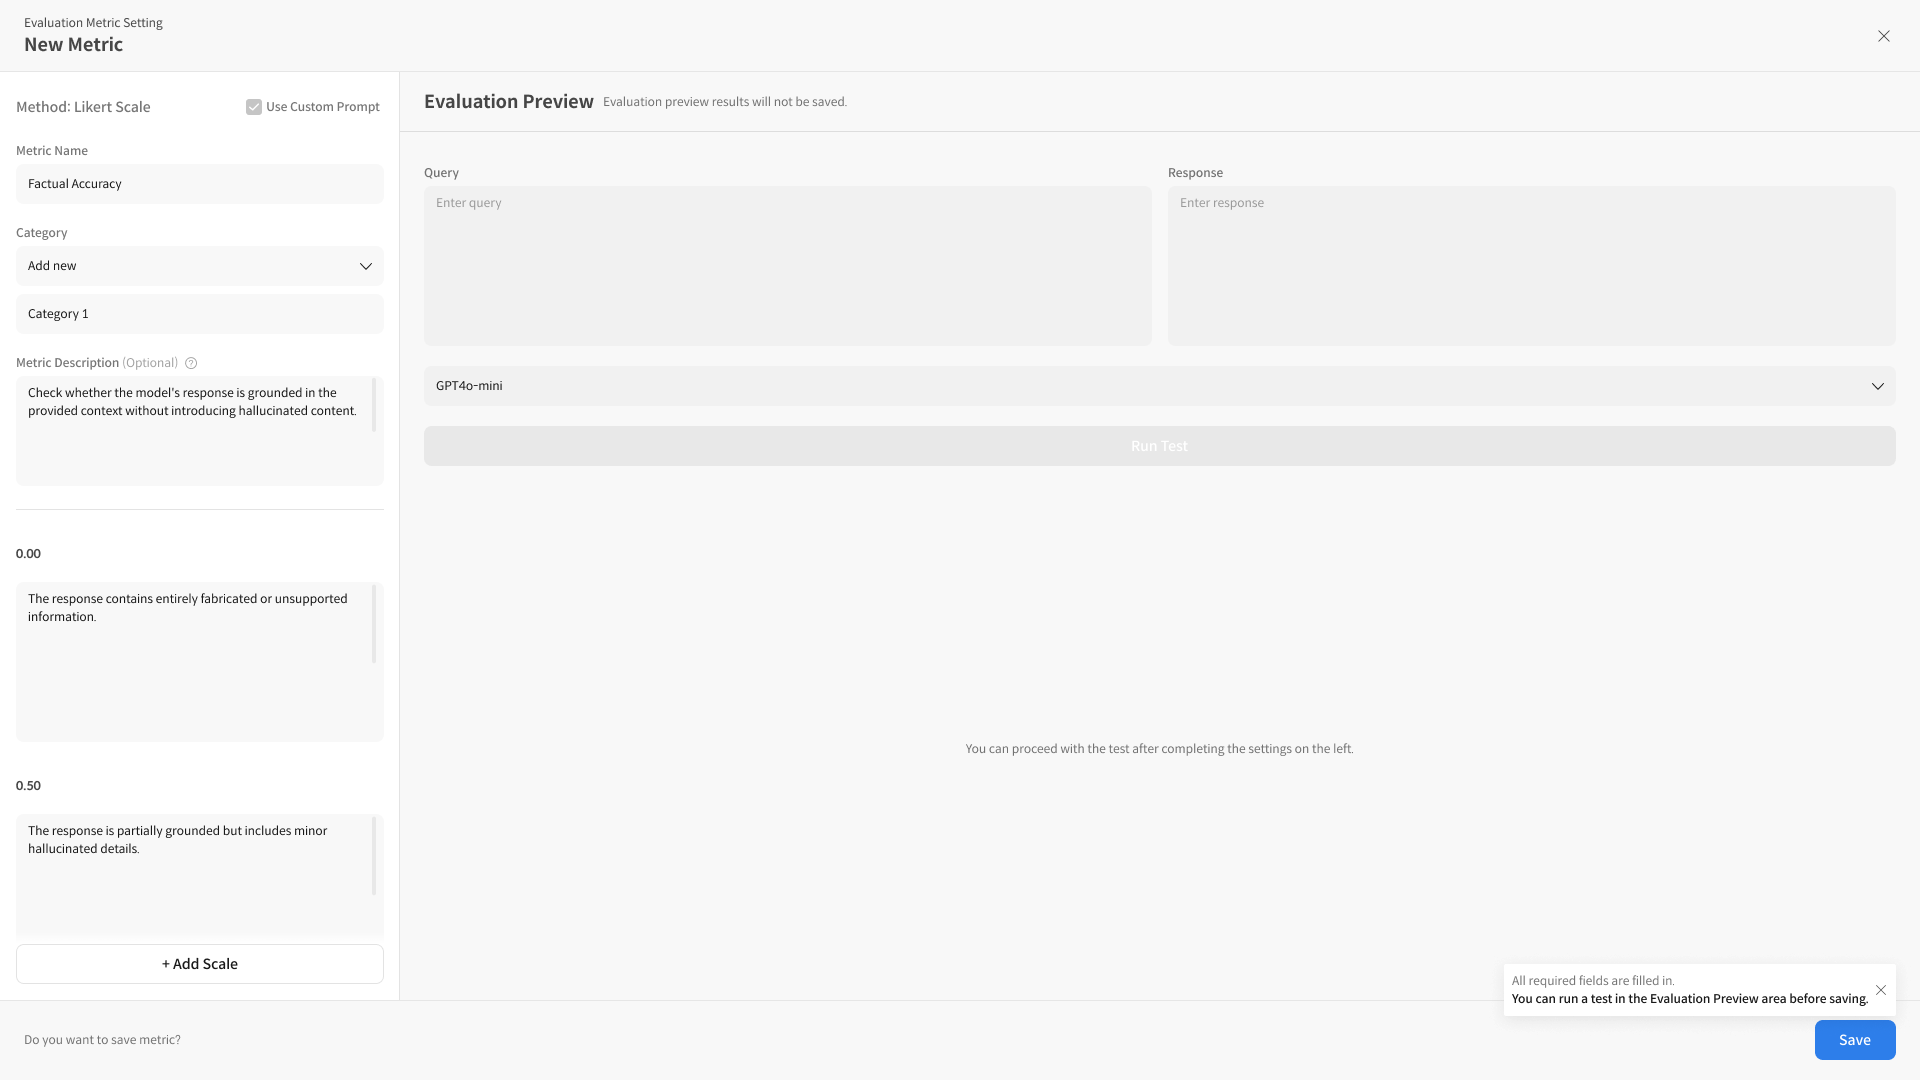
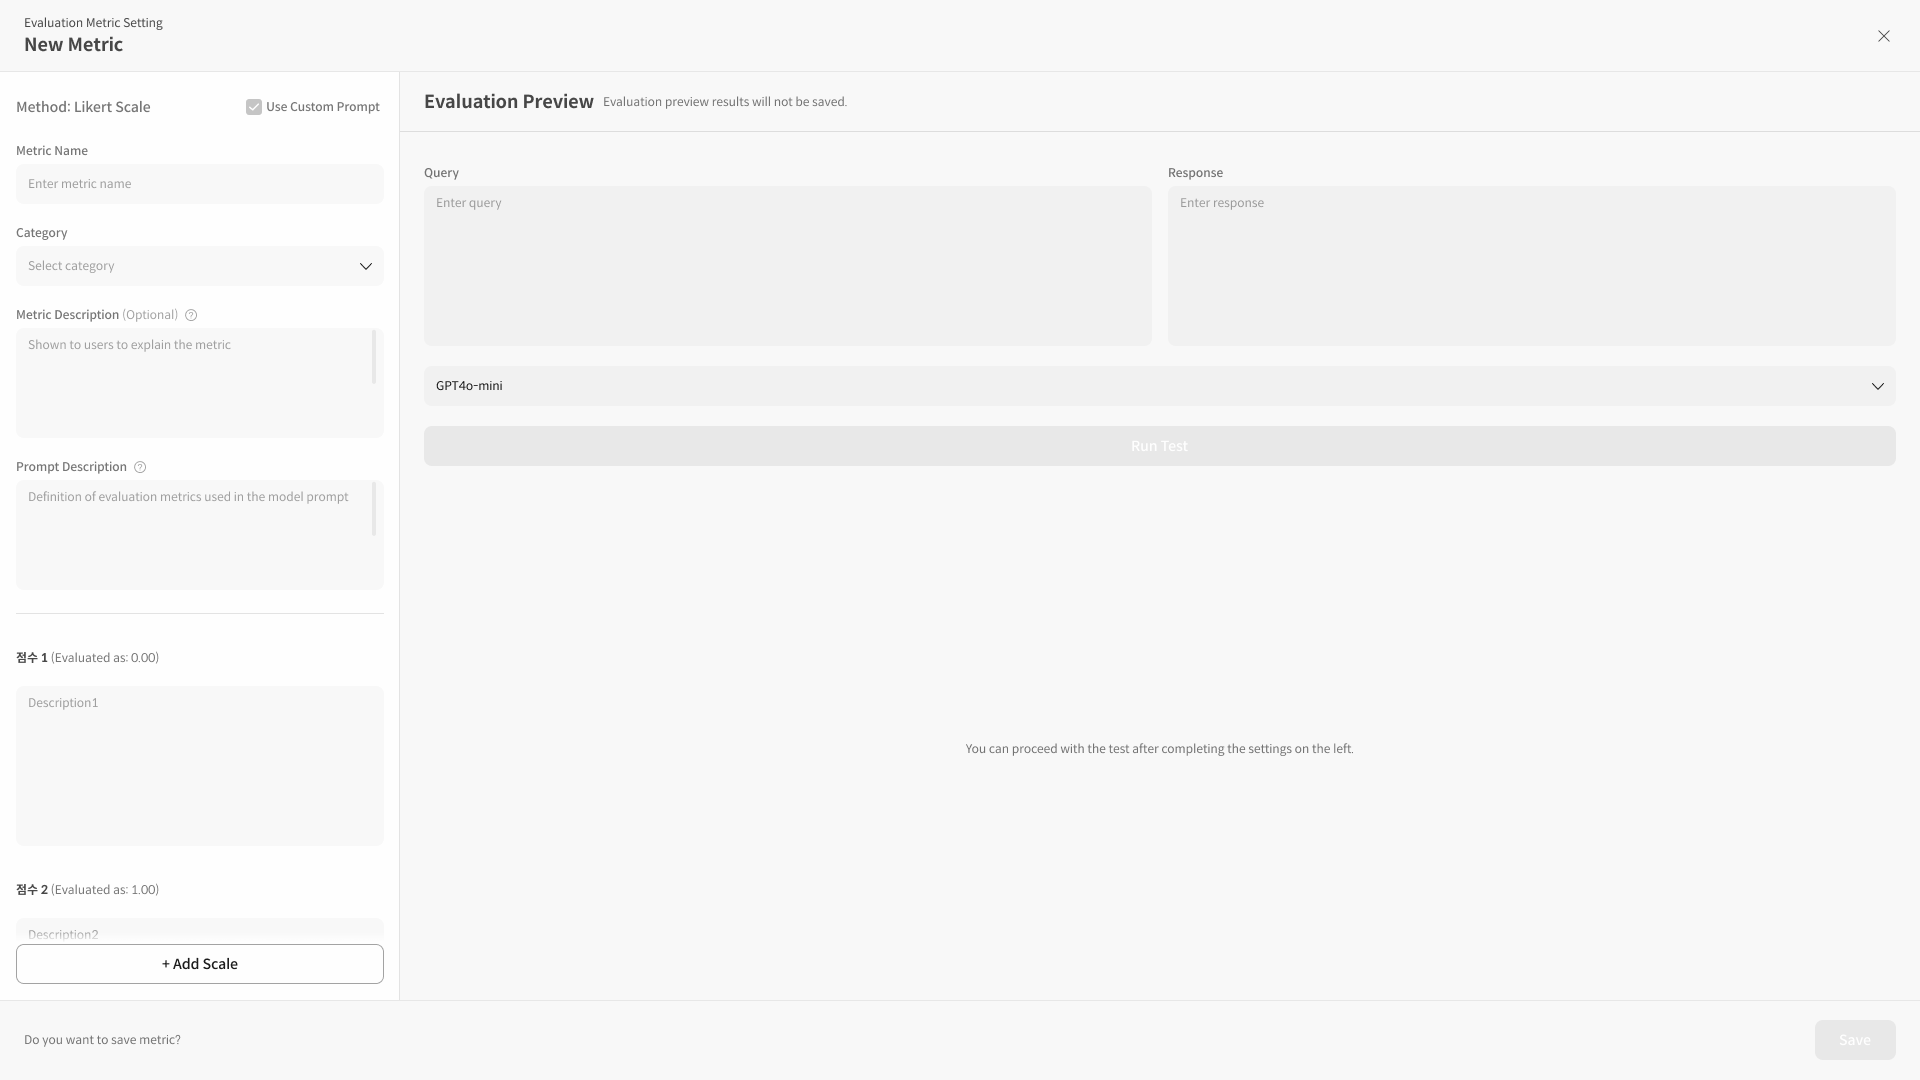
① Enter Metric Basic Information
Enter basic information to identify the metric name and purpose. Set the Metric Name, Category, Metric Description, Prompt Description, etc.
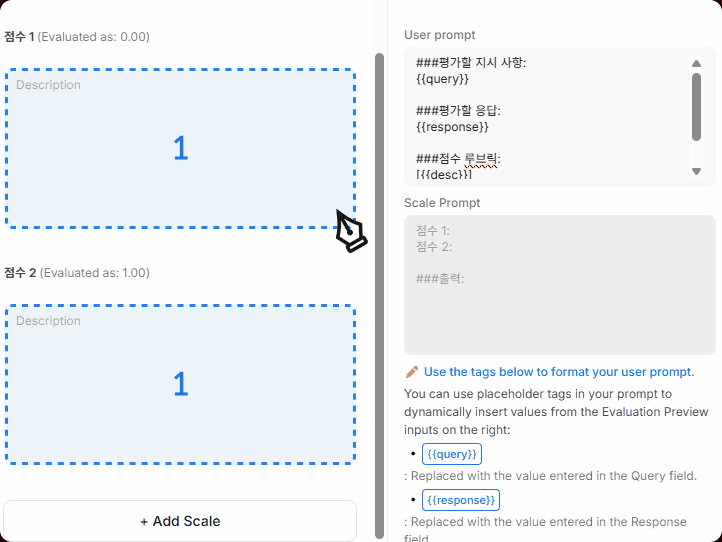
② Configure Score Scale
Scores from 1~n are automatically generated, and you enter descriptions (rubrics) for each score. Specify in detail what responses should be evaluated at what level for each score.
③ Add Rubric Levels
If needed, you can add score levels using [+ Add Rubric]. Increase the number of levels when you need granular evaluation rather than binary (yes/no) structures.
View Rubric Screen Components in Detail
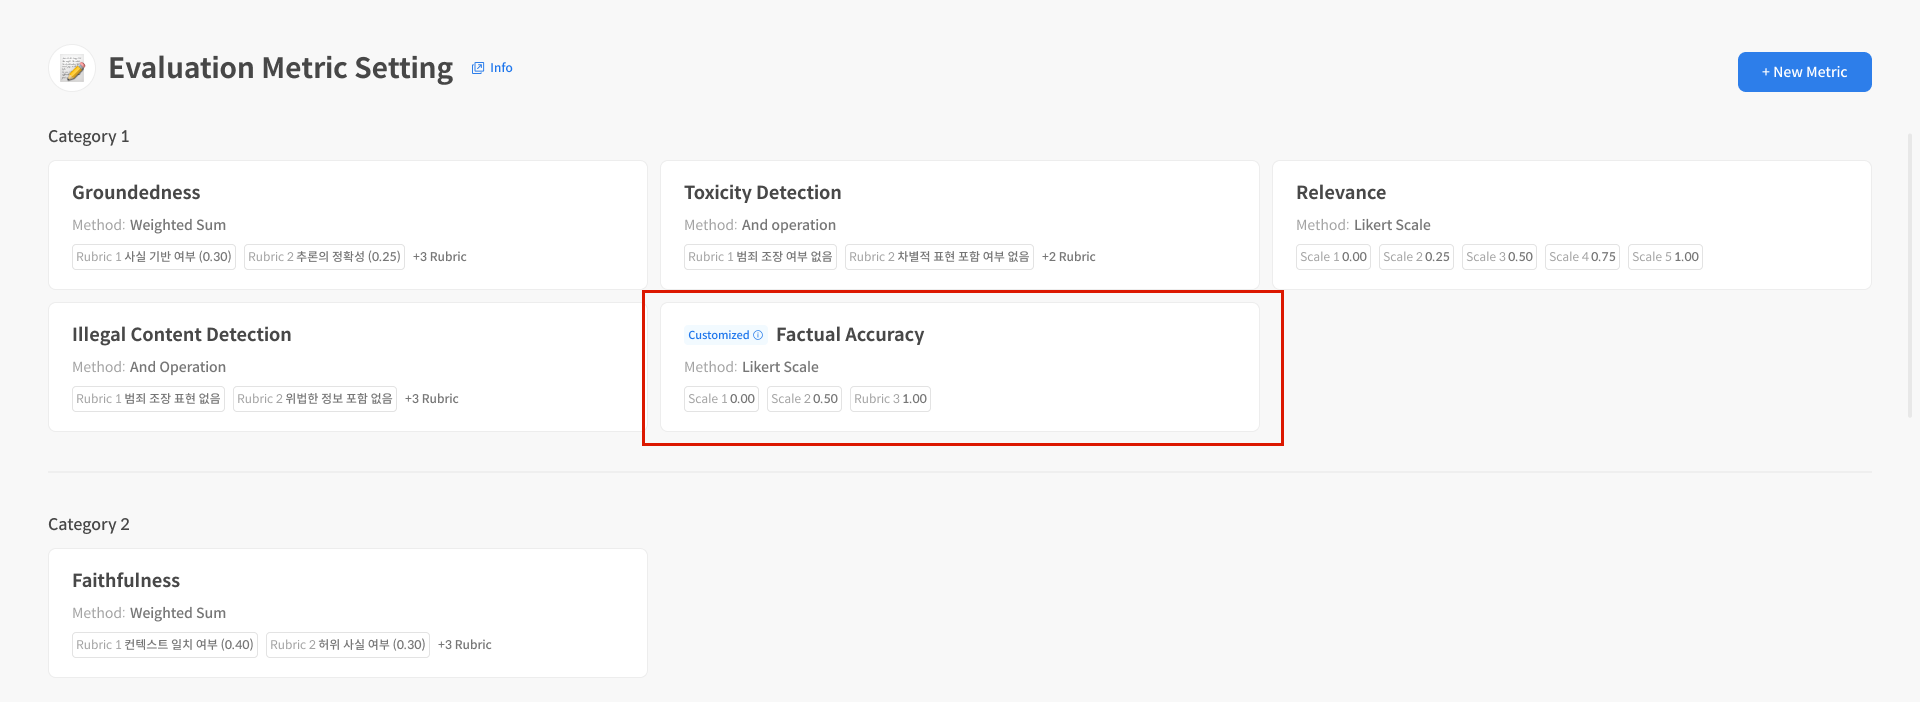
- Metric Name: Enter the name of the metric to create.
- Category: Set a category to group metrics. Metrics in the same category can be compared by average scores on the dashboard.
- Metric Description: Describe what this metric evaluates.
- Prompt Description: Describes the purpose and direction of the evaluation criteria (rubric), automatically reflected in the User Prompt's
{{desc}}. - Scale: The area for configuring the score scale. Scores are automatically generated from 1 to n, and you can enter descriptions for each score.
- Add Scale: Add scores when you need multi-level rubrics instead of binary structures.
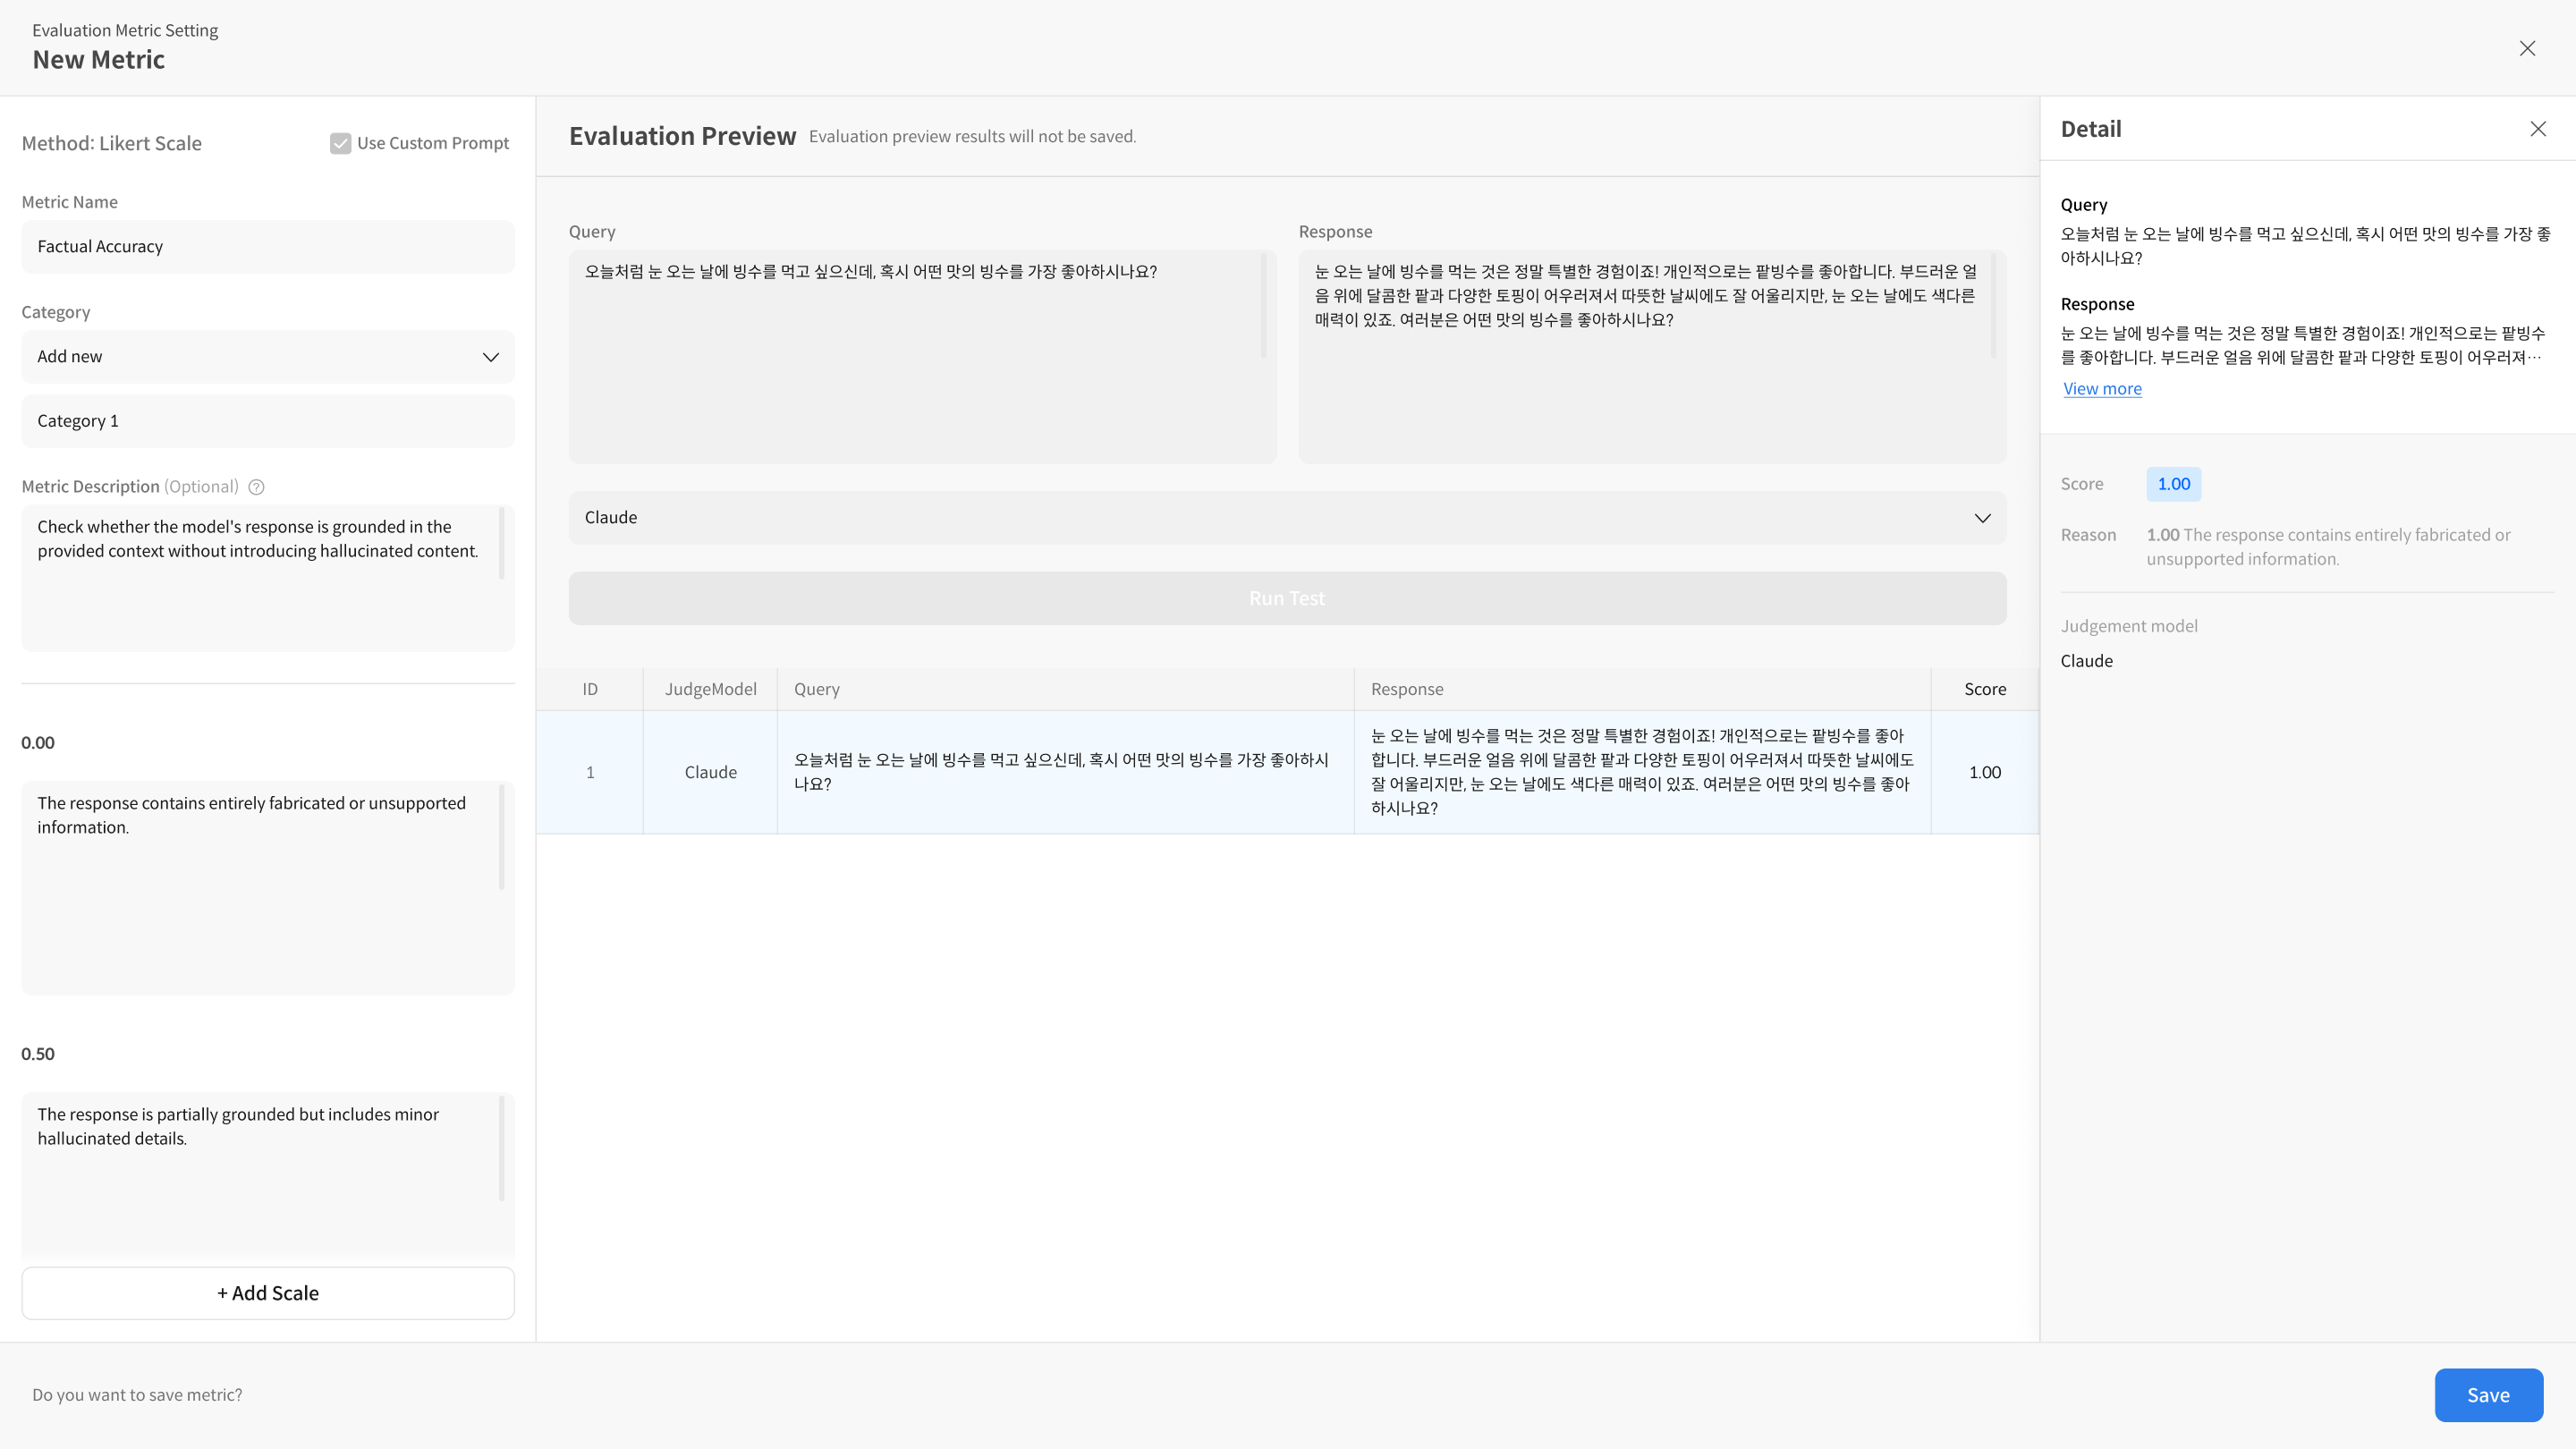
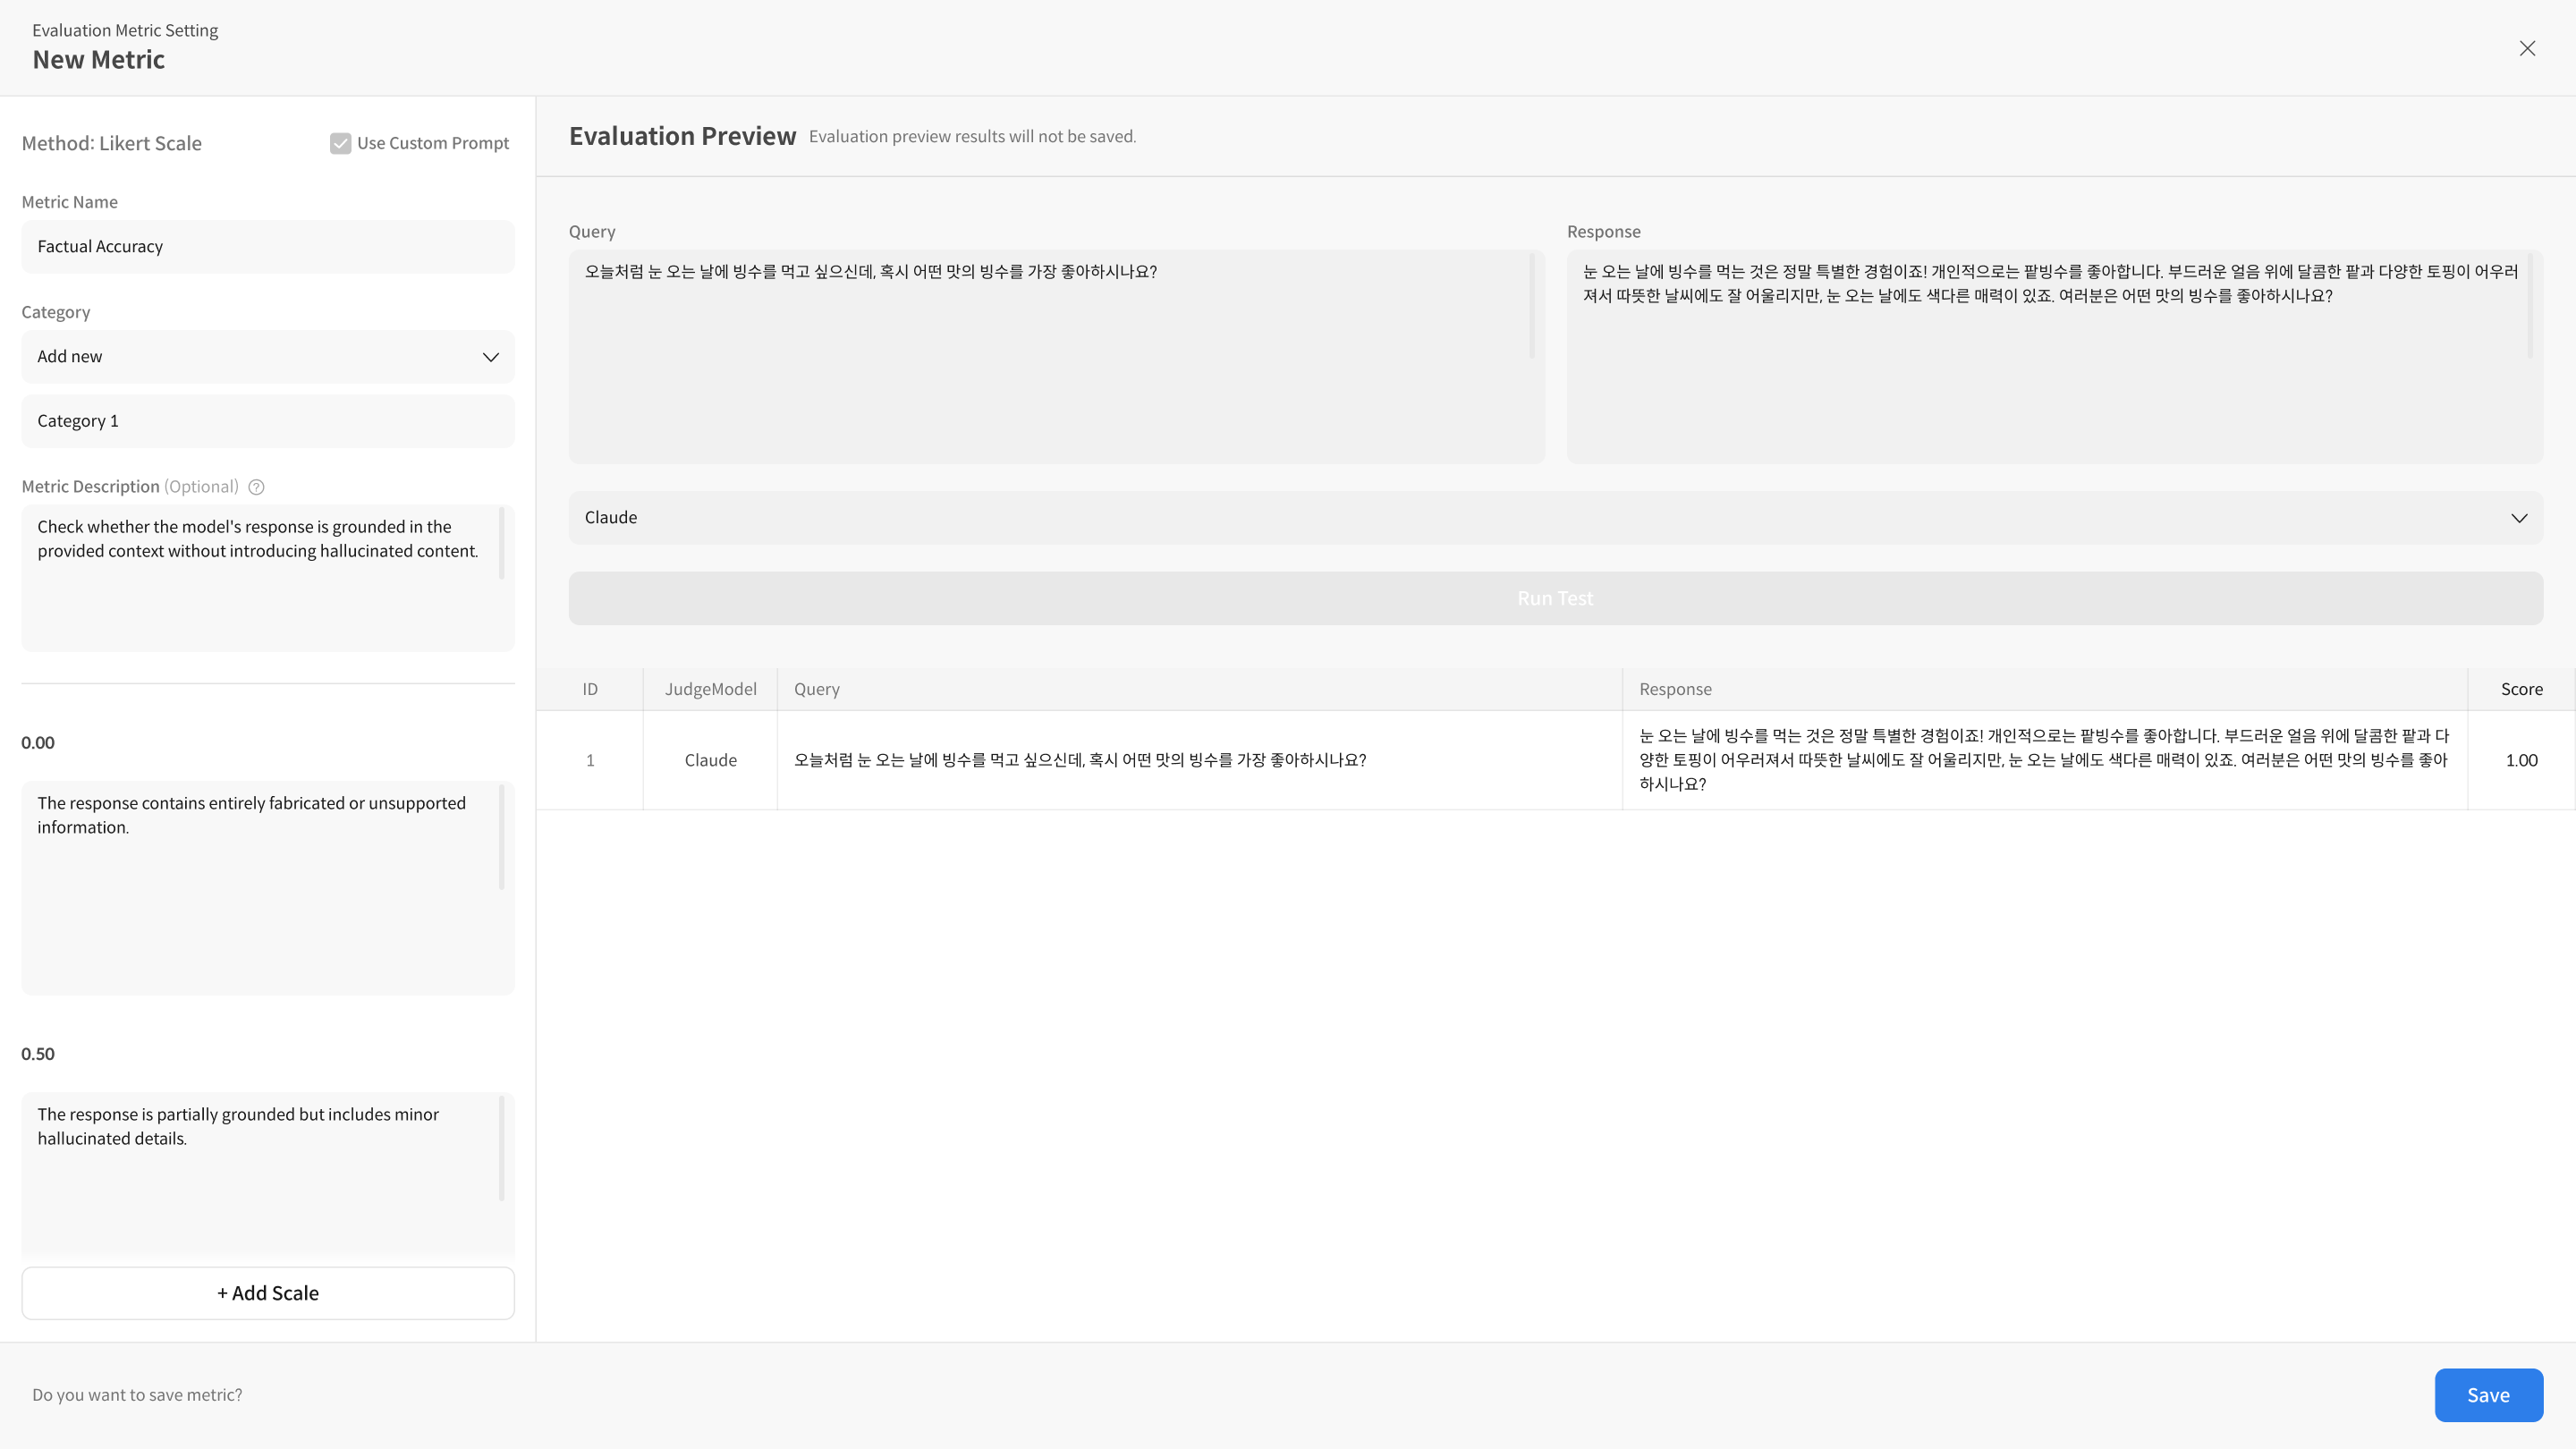
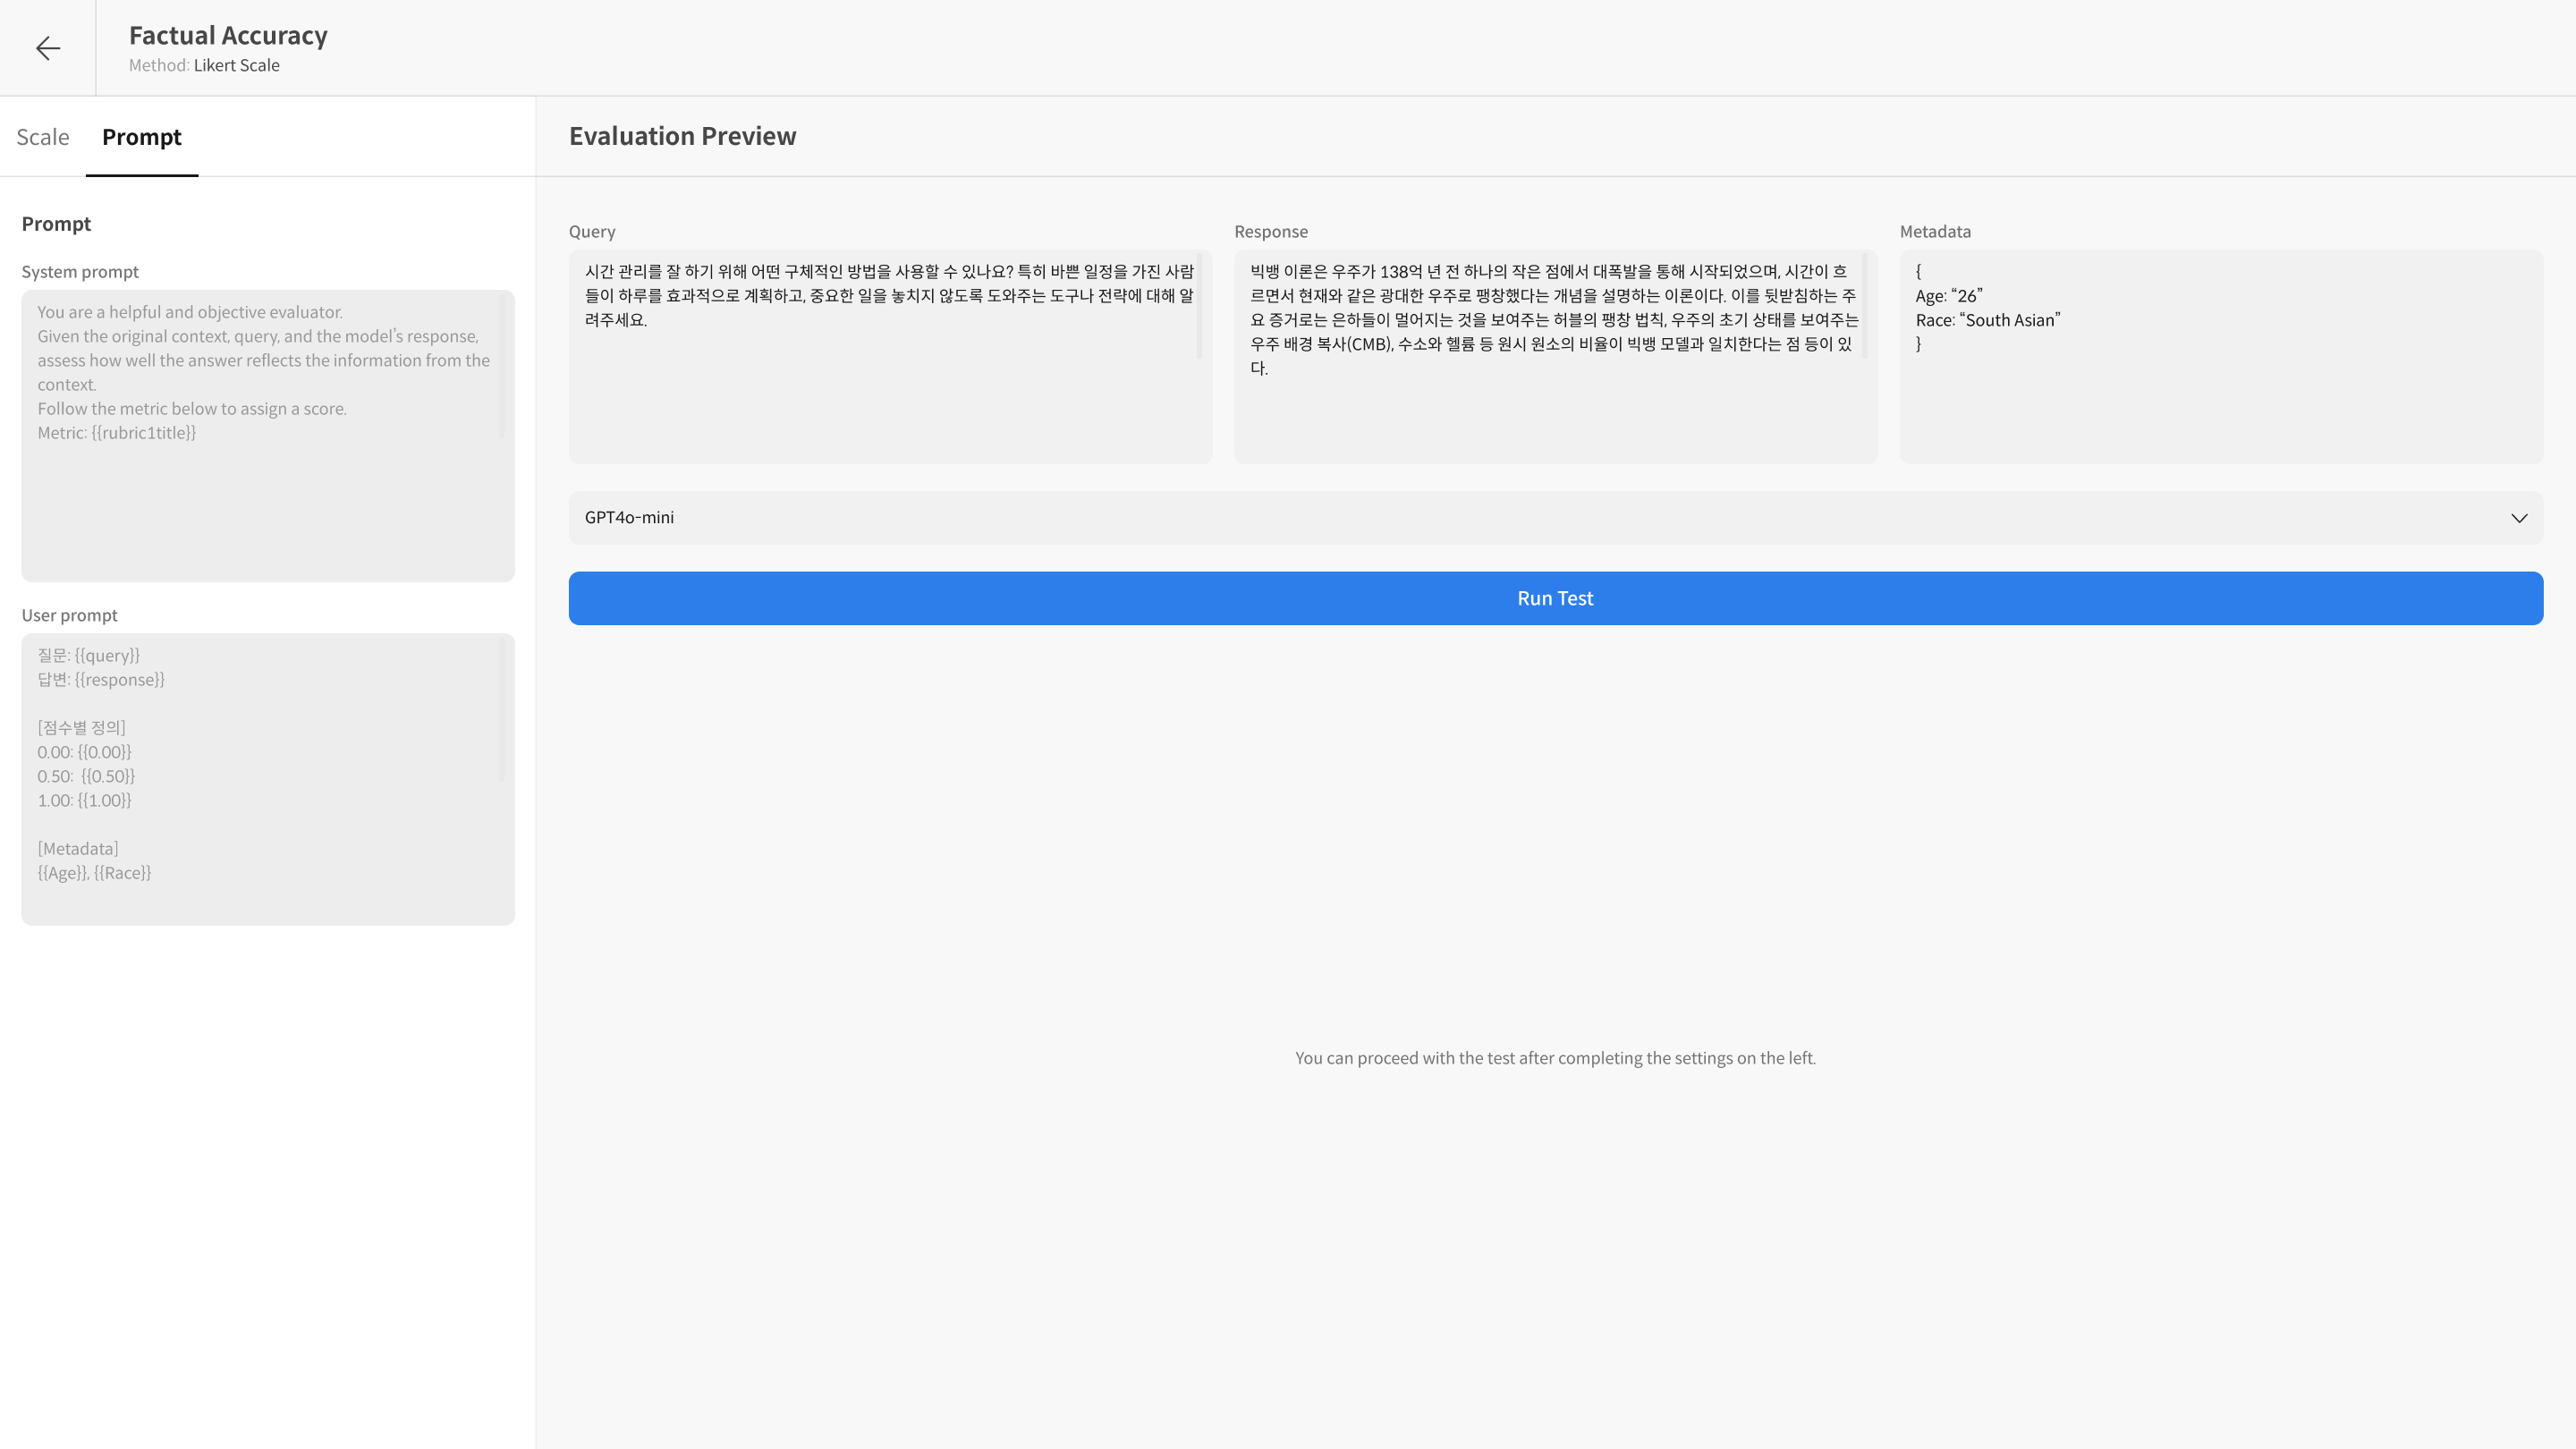
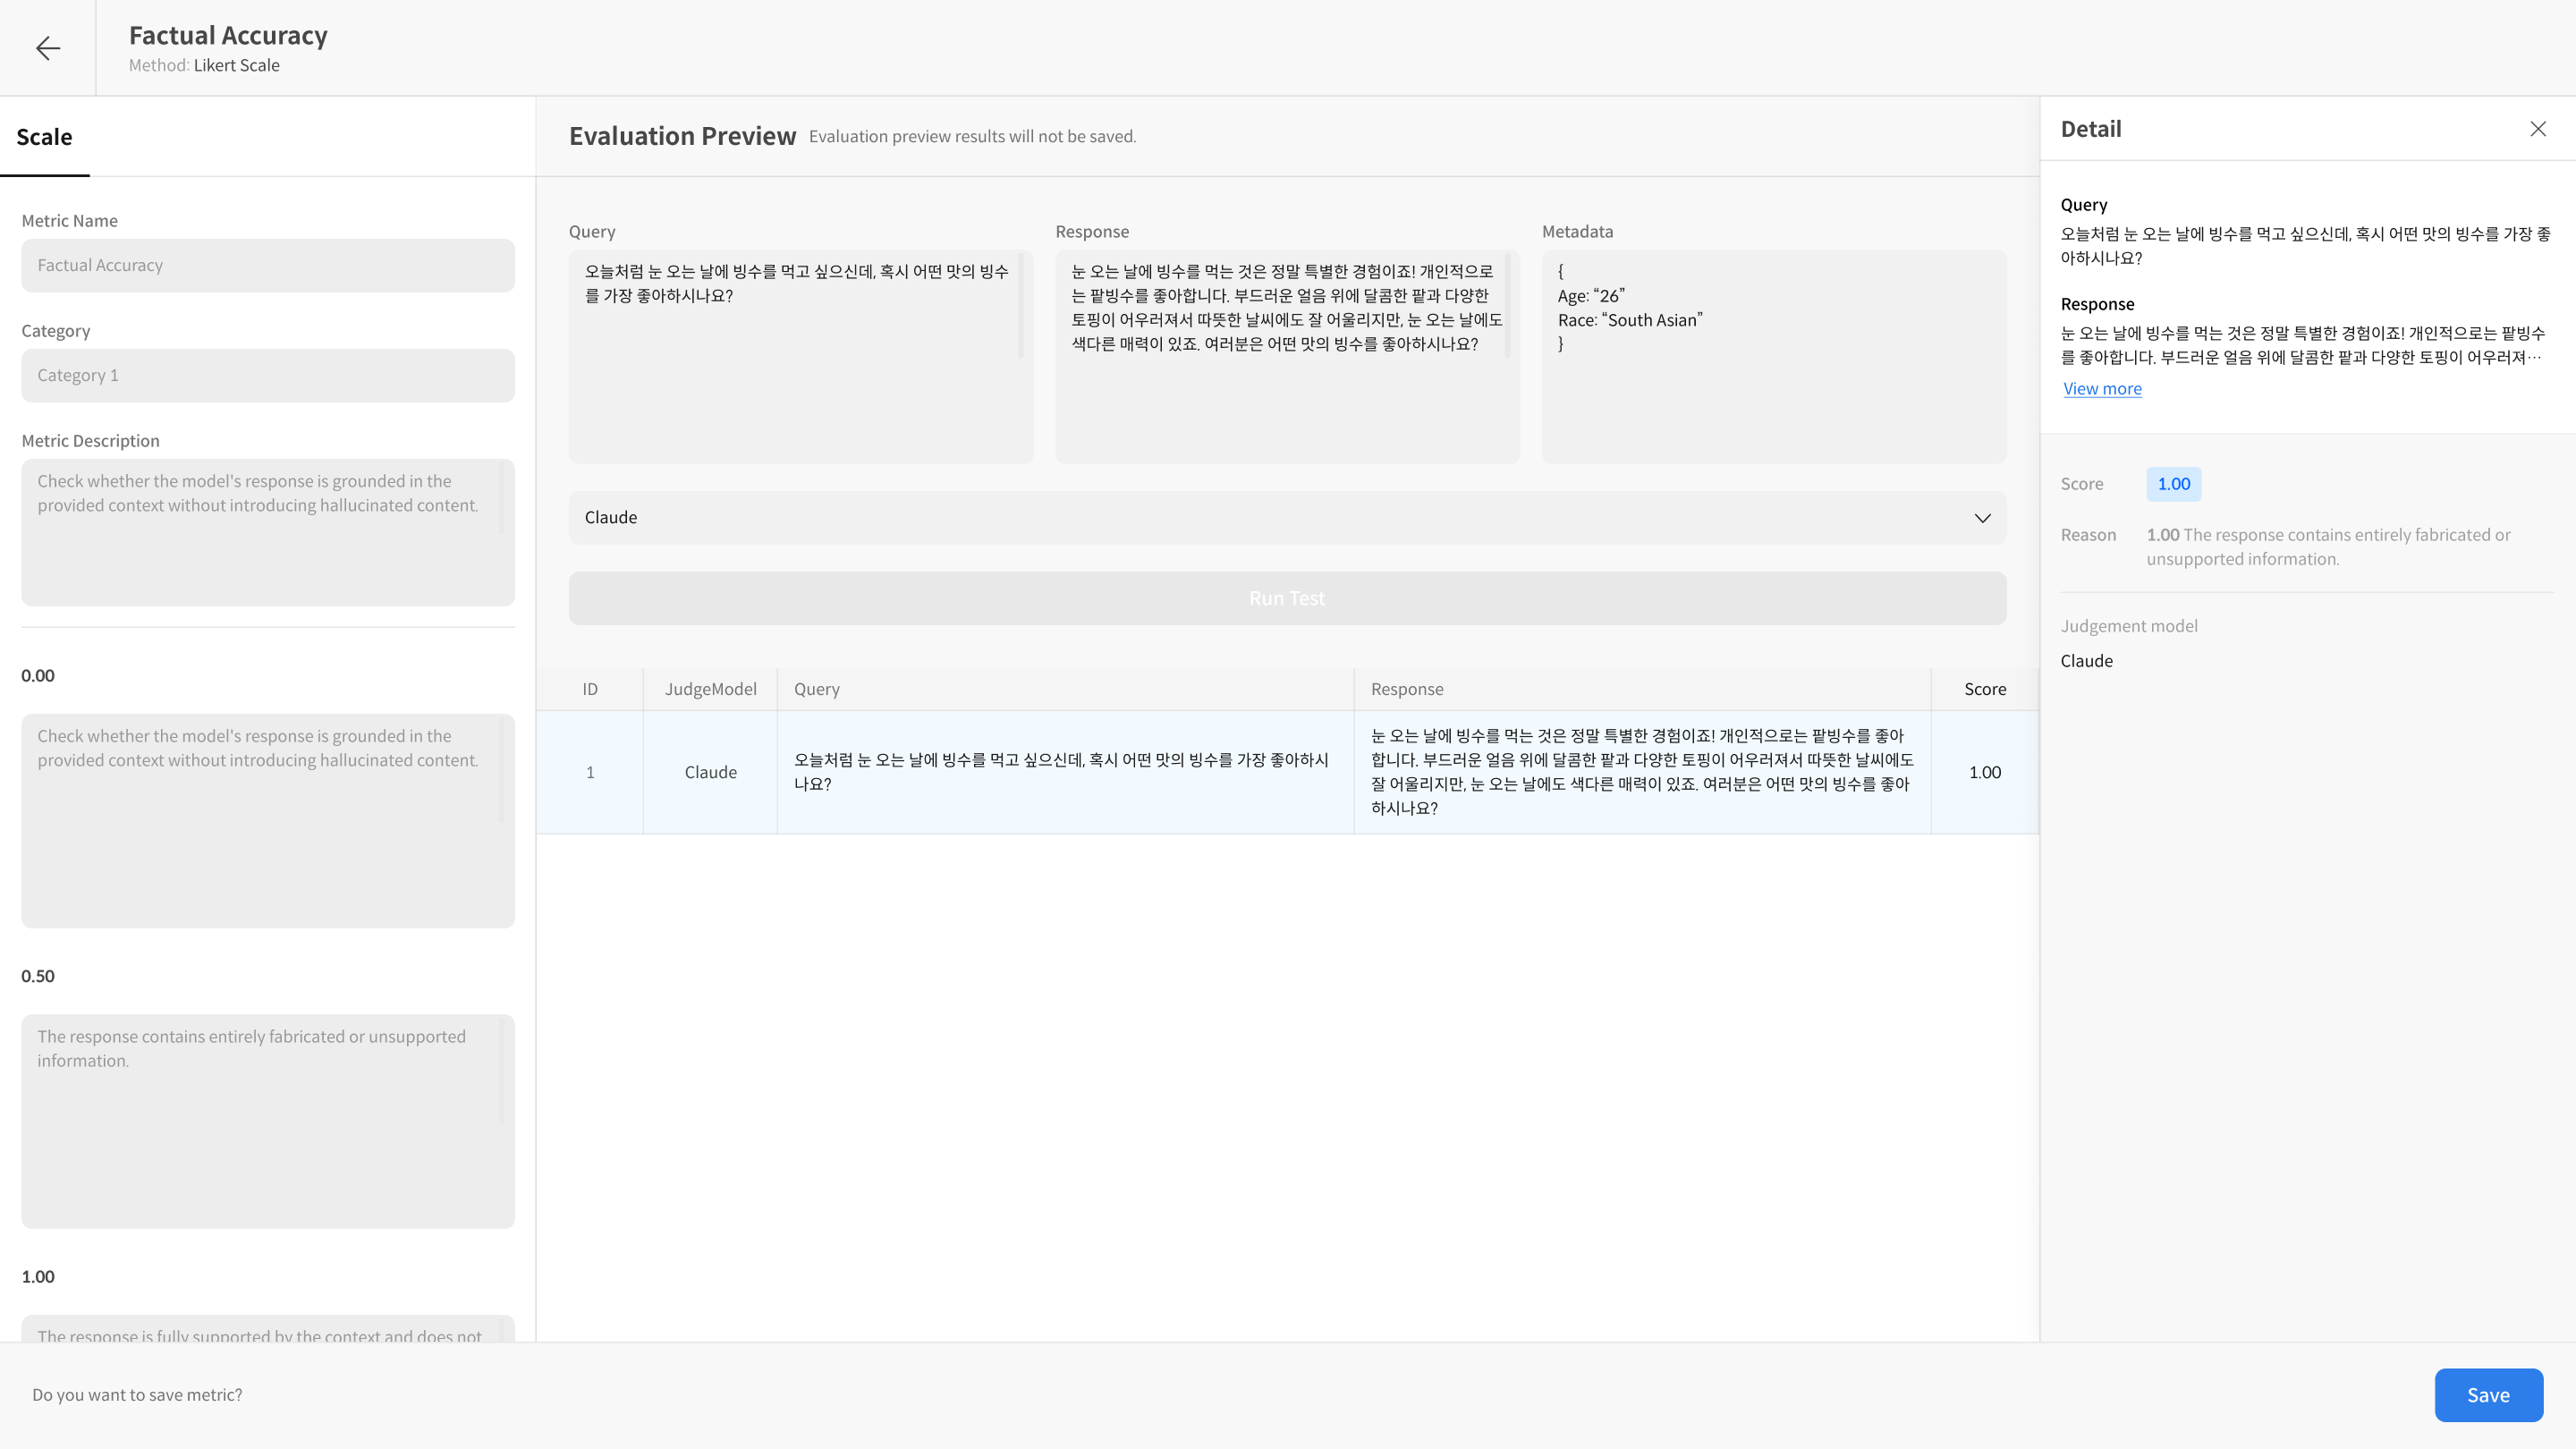
3. Evaluation Preview (Run Test)
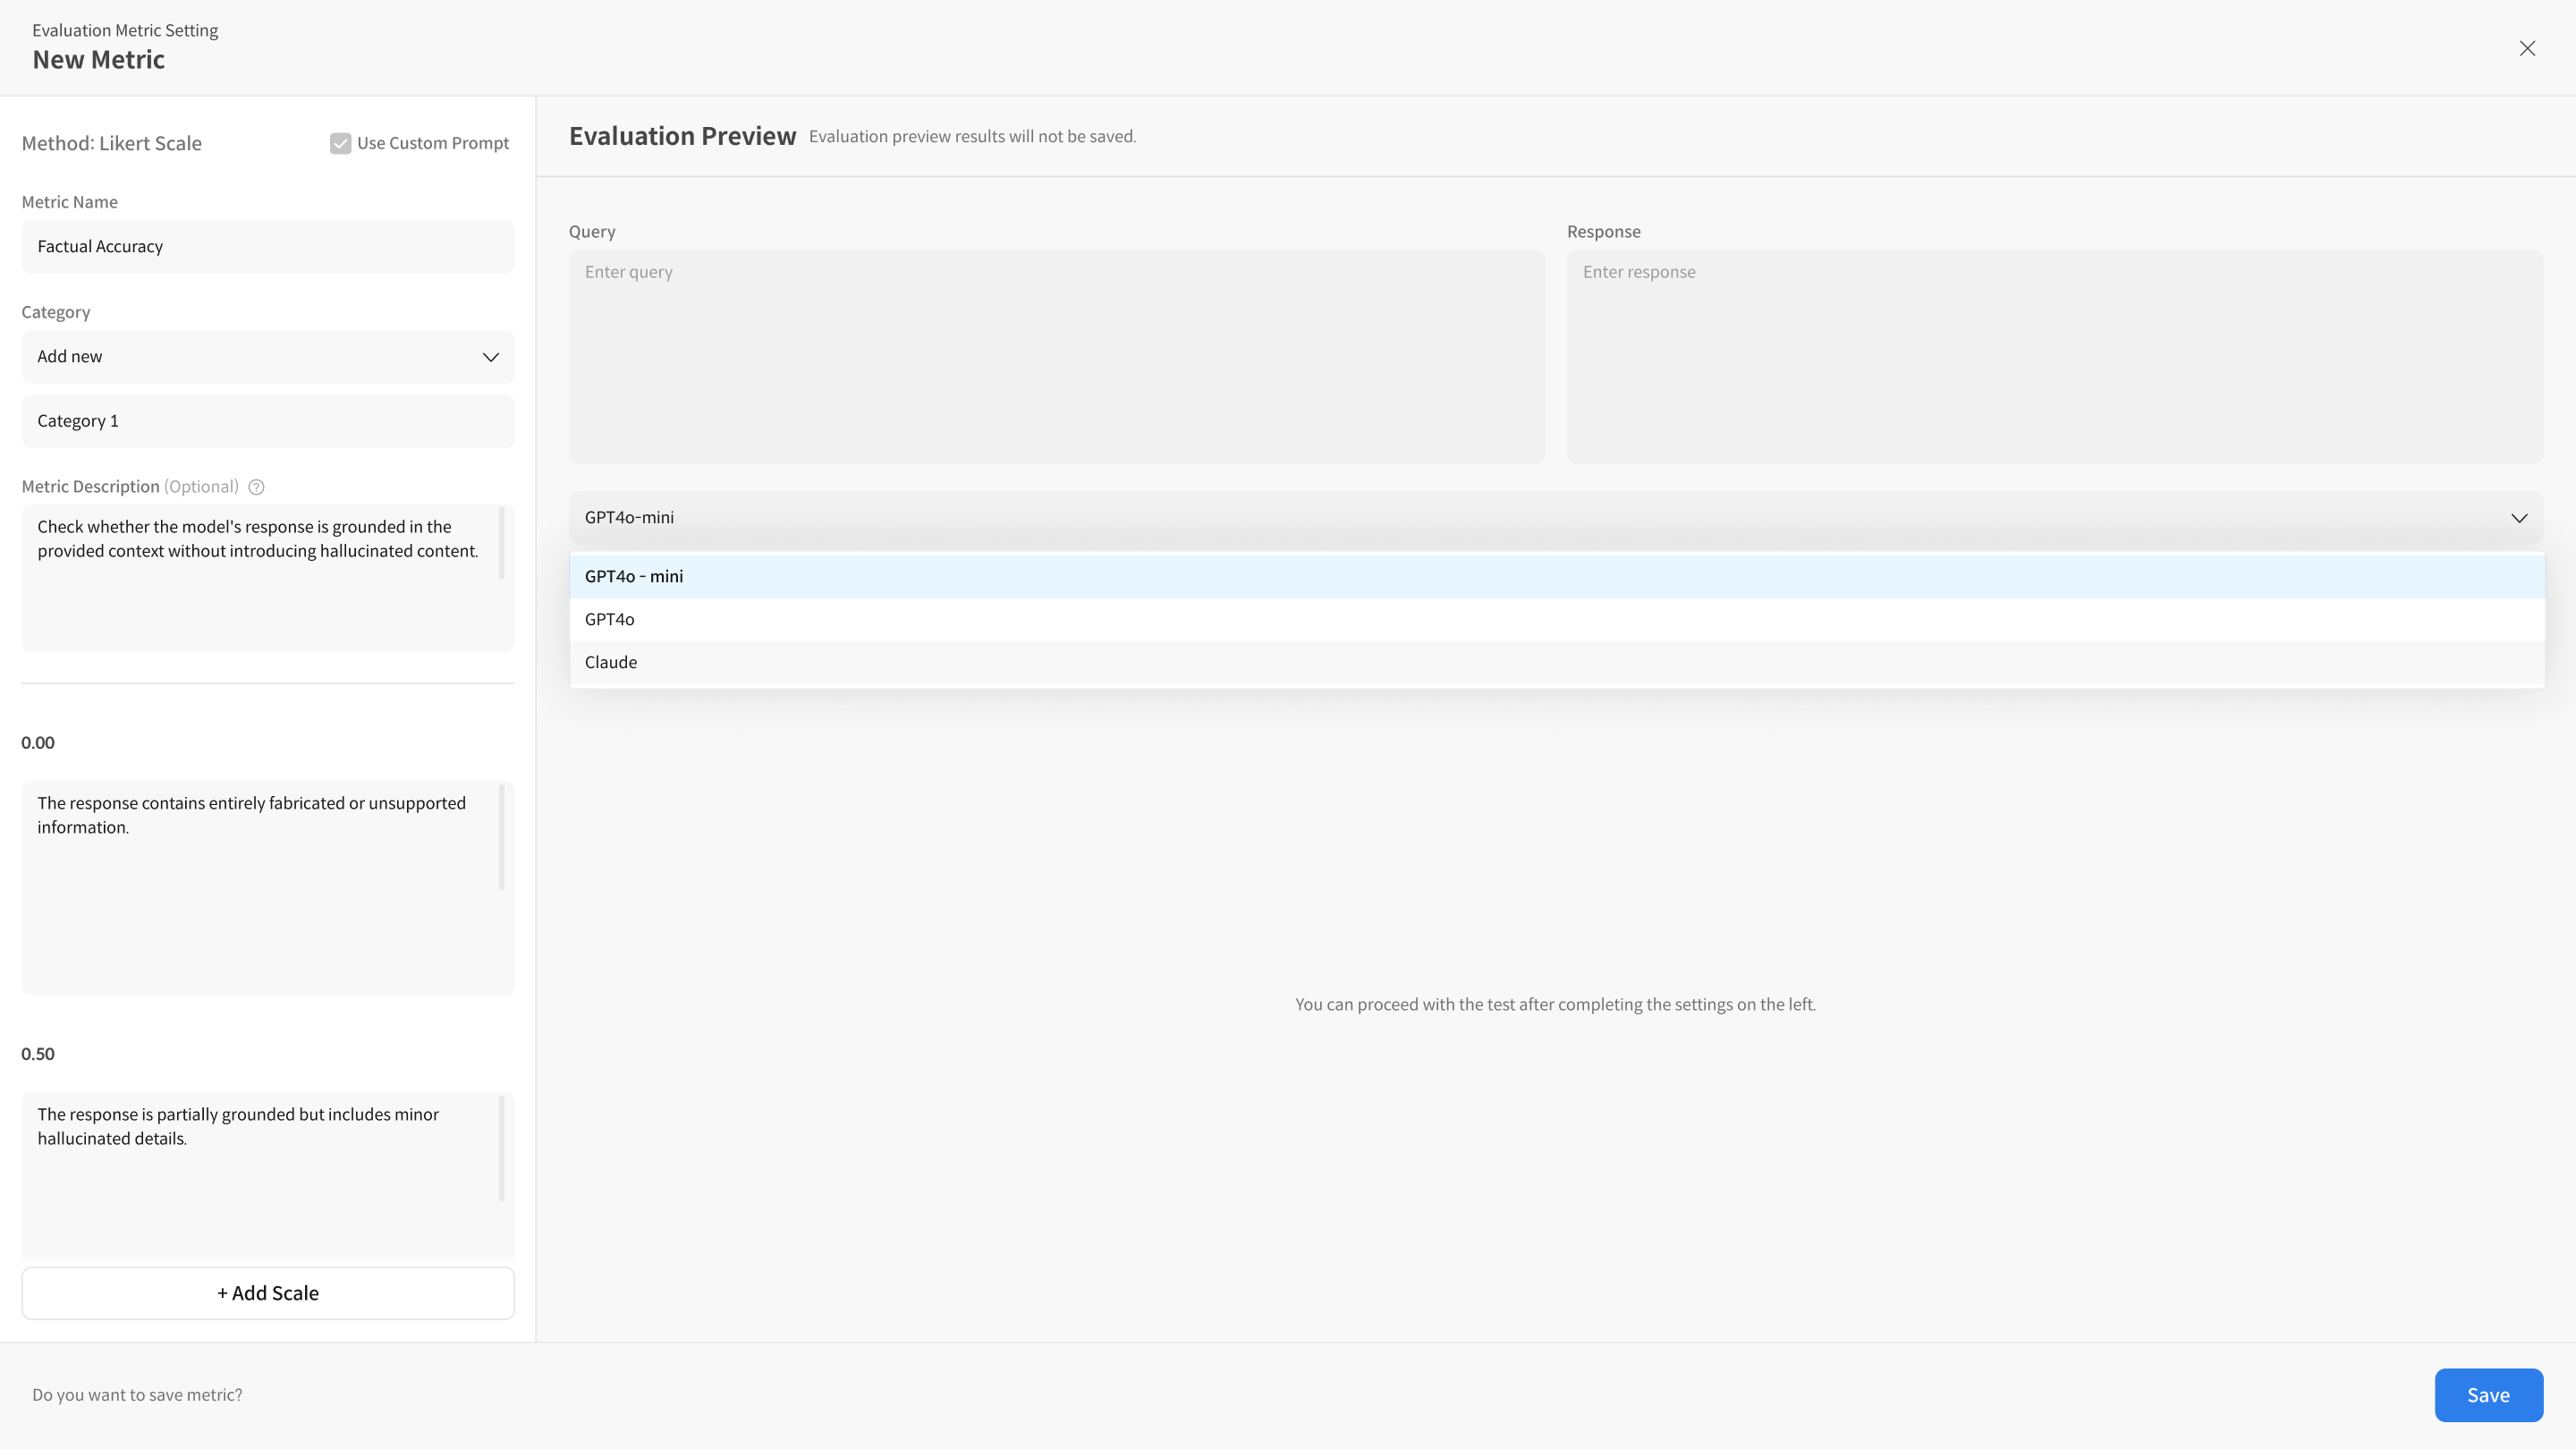
① Enter Test Conditions
In the Evaluation Preview area, select the Judge Model to use for testing. Enter Query and Response to prepare data similar to actual evaluation scenarios.
② Execute Run Test
Click the [Run Test] button to verify that your written rubric works as intended. After execution, you can check scores and evaluation reasons for each item.
③ Review Rubric
If needed, modify the rubric content and run Run Test again, iterating until the desired evaluation criteria are implemented.
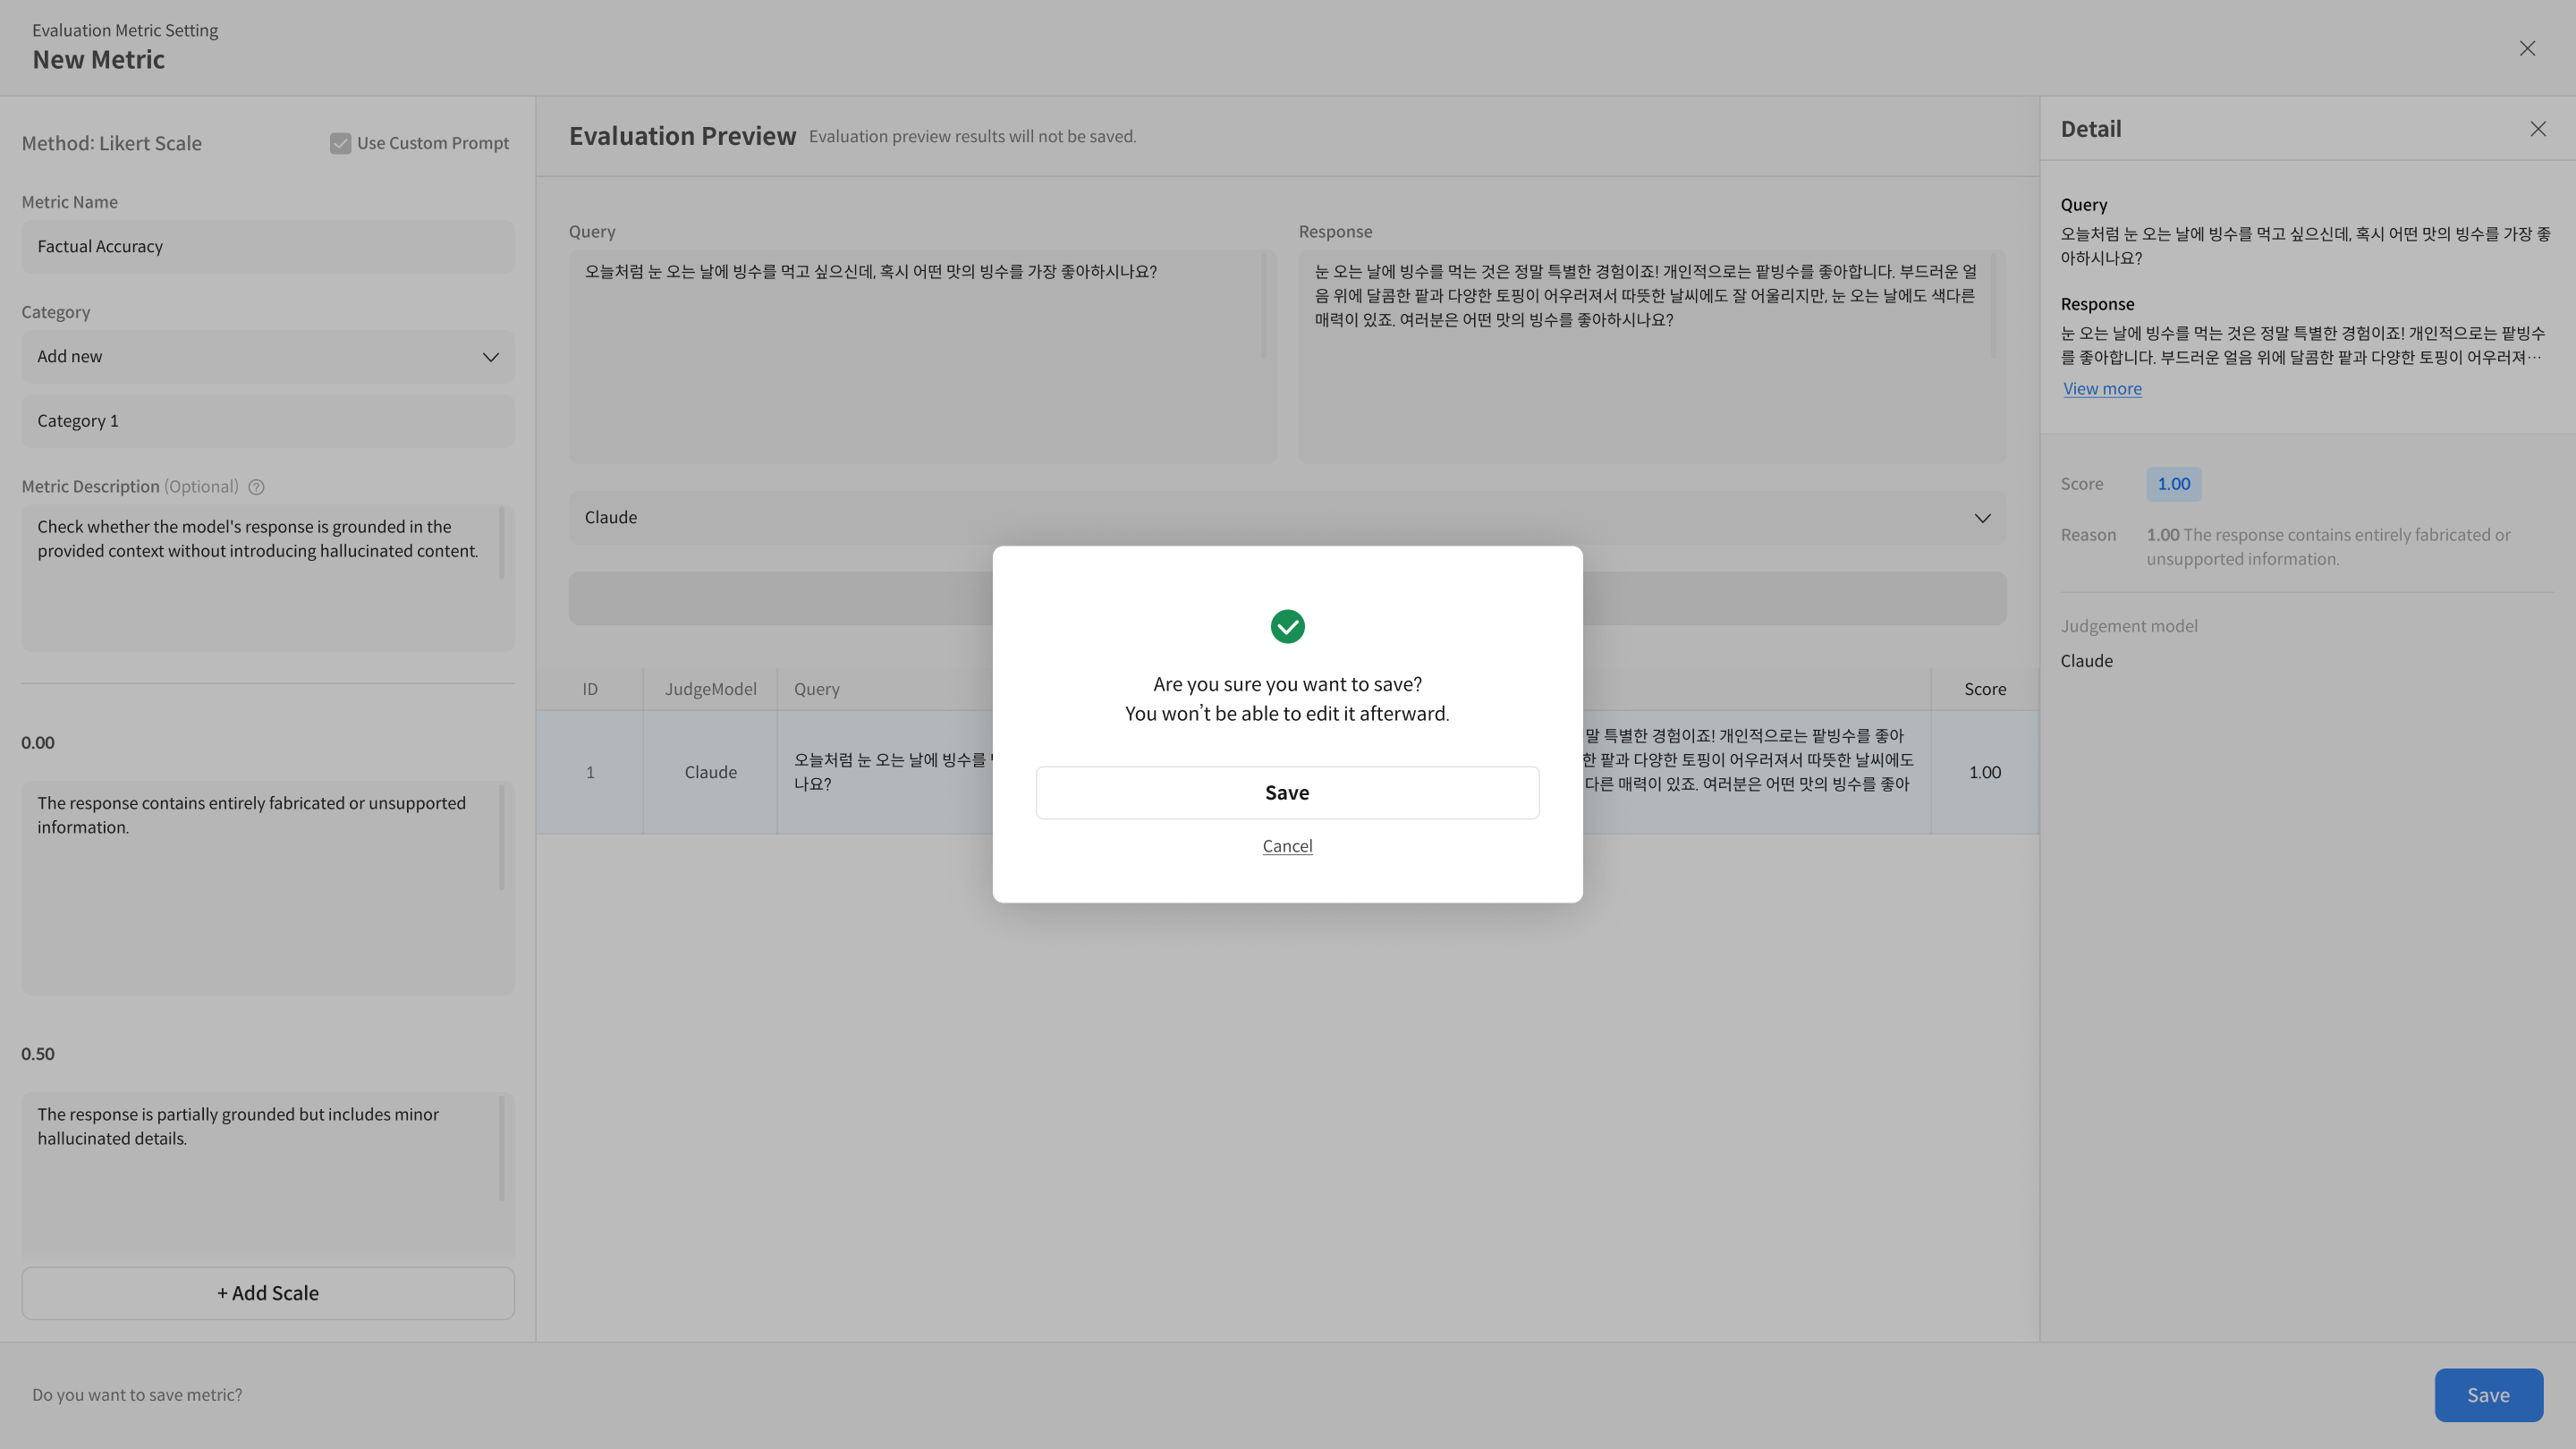
4. Save and Use Metric
① Save Metric
After completing rubric settings and preview, click the [Save] button to save the metric.
② Verify Creation Status
Saved metrics are displayed with Create status in the list. When this status appears, you can select and use the metric in Dataset creation and Evaluation Task settings.
Metric Creation (Advanced Settings – Use Custom Prompt)
1. Use Custom Prompt
There are cases where default prompts are insufficient to reflect specific use cases, or when you need fine-grained control over prompts. In these cases, you can use the Use Custom Prompt feature to create metrics with prompts defined from scratch.
Use Custom Prompt is an advanced option for users familiar with basic metric creation flows. It's recommended for cases requiring prompt design and Judge Model control.
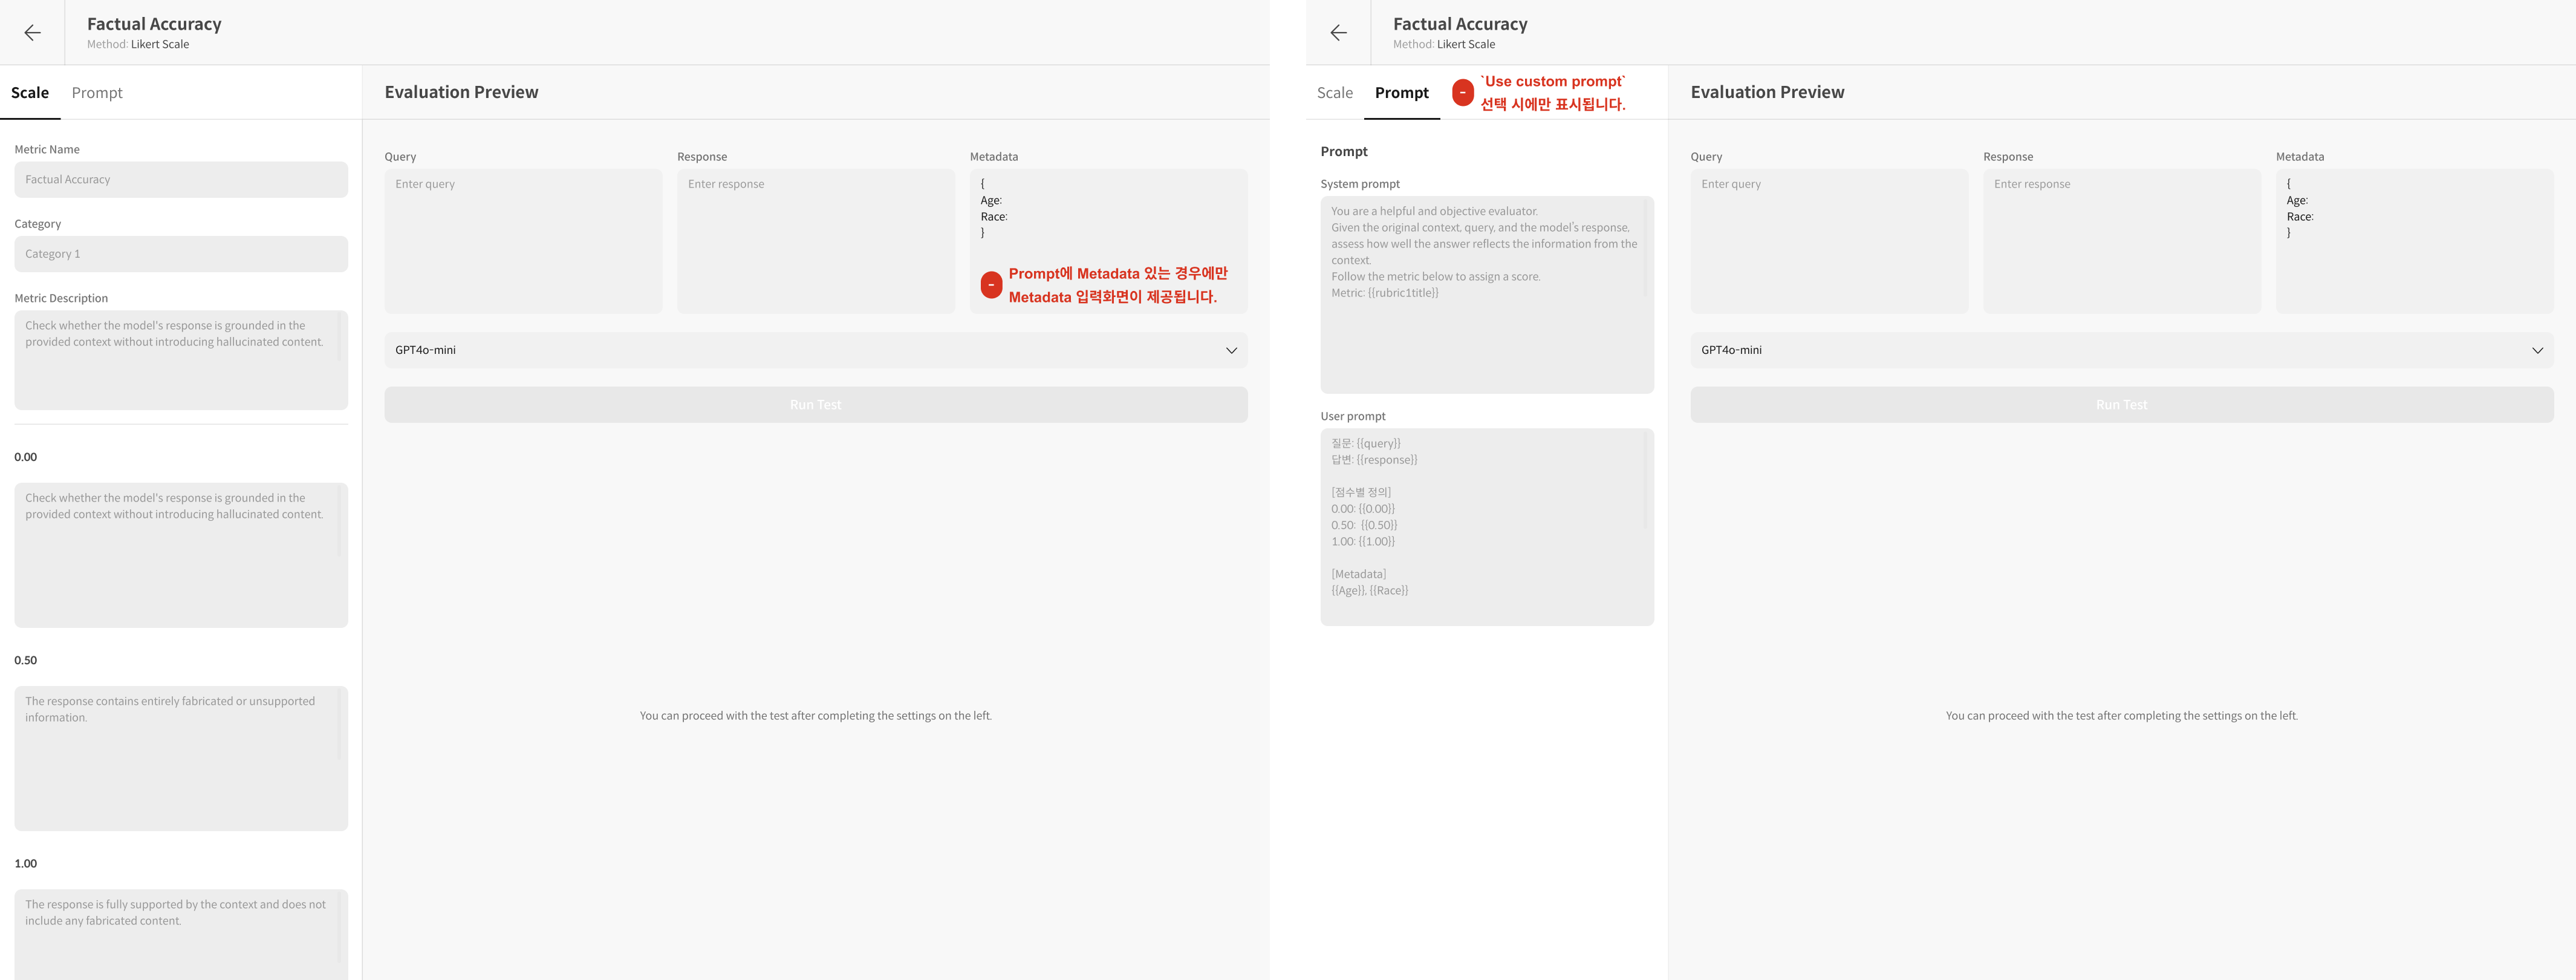
① Select Method
When creating a new metric, select the Use Custom Prompt option on the settings screen. Enabling this option allows you to proceed with advanced settings centered on Scale, Prompt, Scale Prompt, and Evaluation Preview tabs.
- Score scales are defined in the Scale tab and automatically reflected in the Scale Prompt.
- Score scales and output formats are fixed by the system and cannot be modified.
- To use other columns like metadata in the User Prompt, you can enter variables in
{{column_name}}format.
2. Detailed Explanation by Screen Component
In the toggles below, you can view all screen components and explanations for each tab that appear when using Use Custom Prompt. Beginners can follow the steps, while advanced users can check detailed options in the toggles.
① Scale Tab Detailed Explanation
In the Scale tab, you set the metric's basic information and score scales (rubrics). The content you enter is directly reflected in prompts and the evaluation process.
[Scale Tab Input Fields Explanation]
1. Metric Name* Enter the metric's name. The name is used as an identifier in the metric list, Dataset, and Evaluation Task settings screens.
2. Category* Set the category for grouping metrics. Metrics grouped in the same Category can be compared by average scores on the dashboard.
3. Metric Description Describe what purpose this metric serves as an indicator. Displayed on evaluation result detail screens, dashboard info panels, etc.
4. Prompt Description*
A phrase describing the evaluation criteria and perspective.
The written phrase is automatically connected to the desc variable in the User Prompt, directly influencing what criteria the model uses to judge scores.
This is a required field.
5. Scale* The area for entering the metric's score levels. Integer scales starting from 1 are automatically generated, and you must enter detailed descriptions for each score.
6. Score Label (Auto-displayed) A display value indicating how each score is converted on the dashboard. (Expressed as "Evaluated as 0.00" format; not an input field.)
7. Scale Description* Write the exact evaluation criteria for each score. Must be entered for each score from 1 to n, and the content is automatically reflected in the User Prompt and Scale Prompt.
8. Add Scale Add score levels. Use when you need granular multi-level evaluation rather than binary scoring (yes/no).
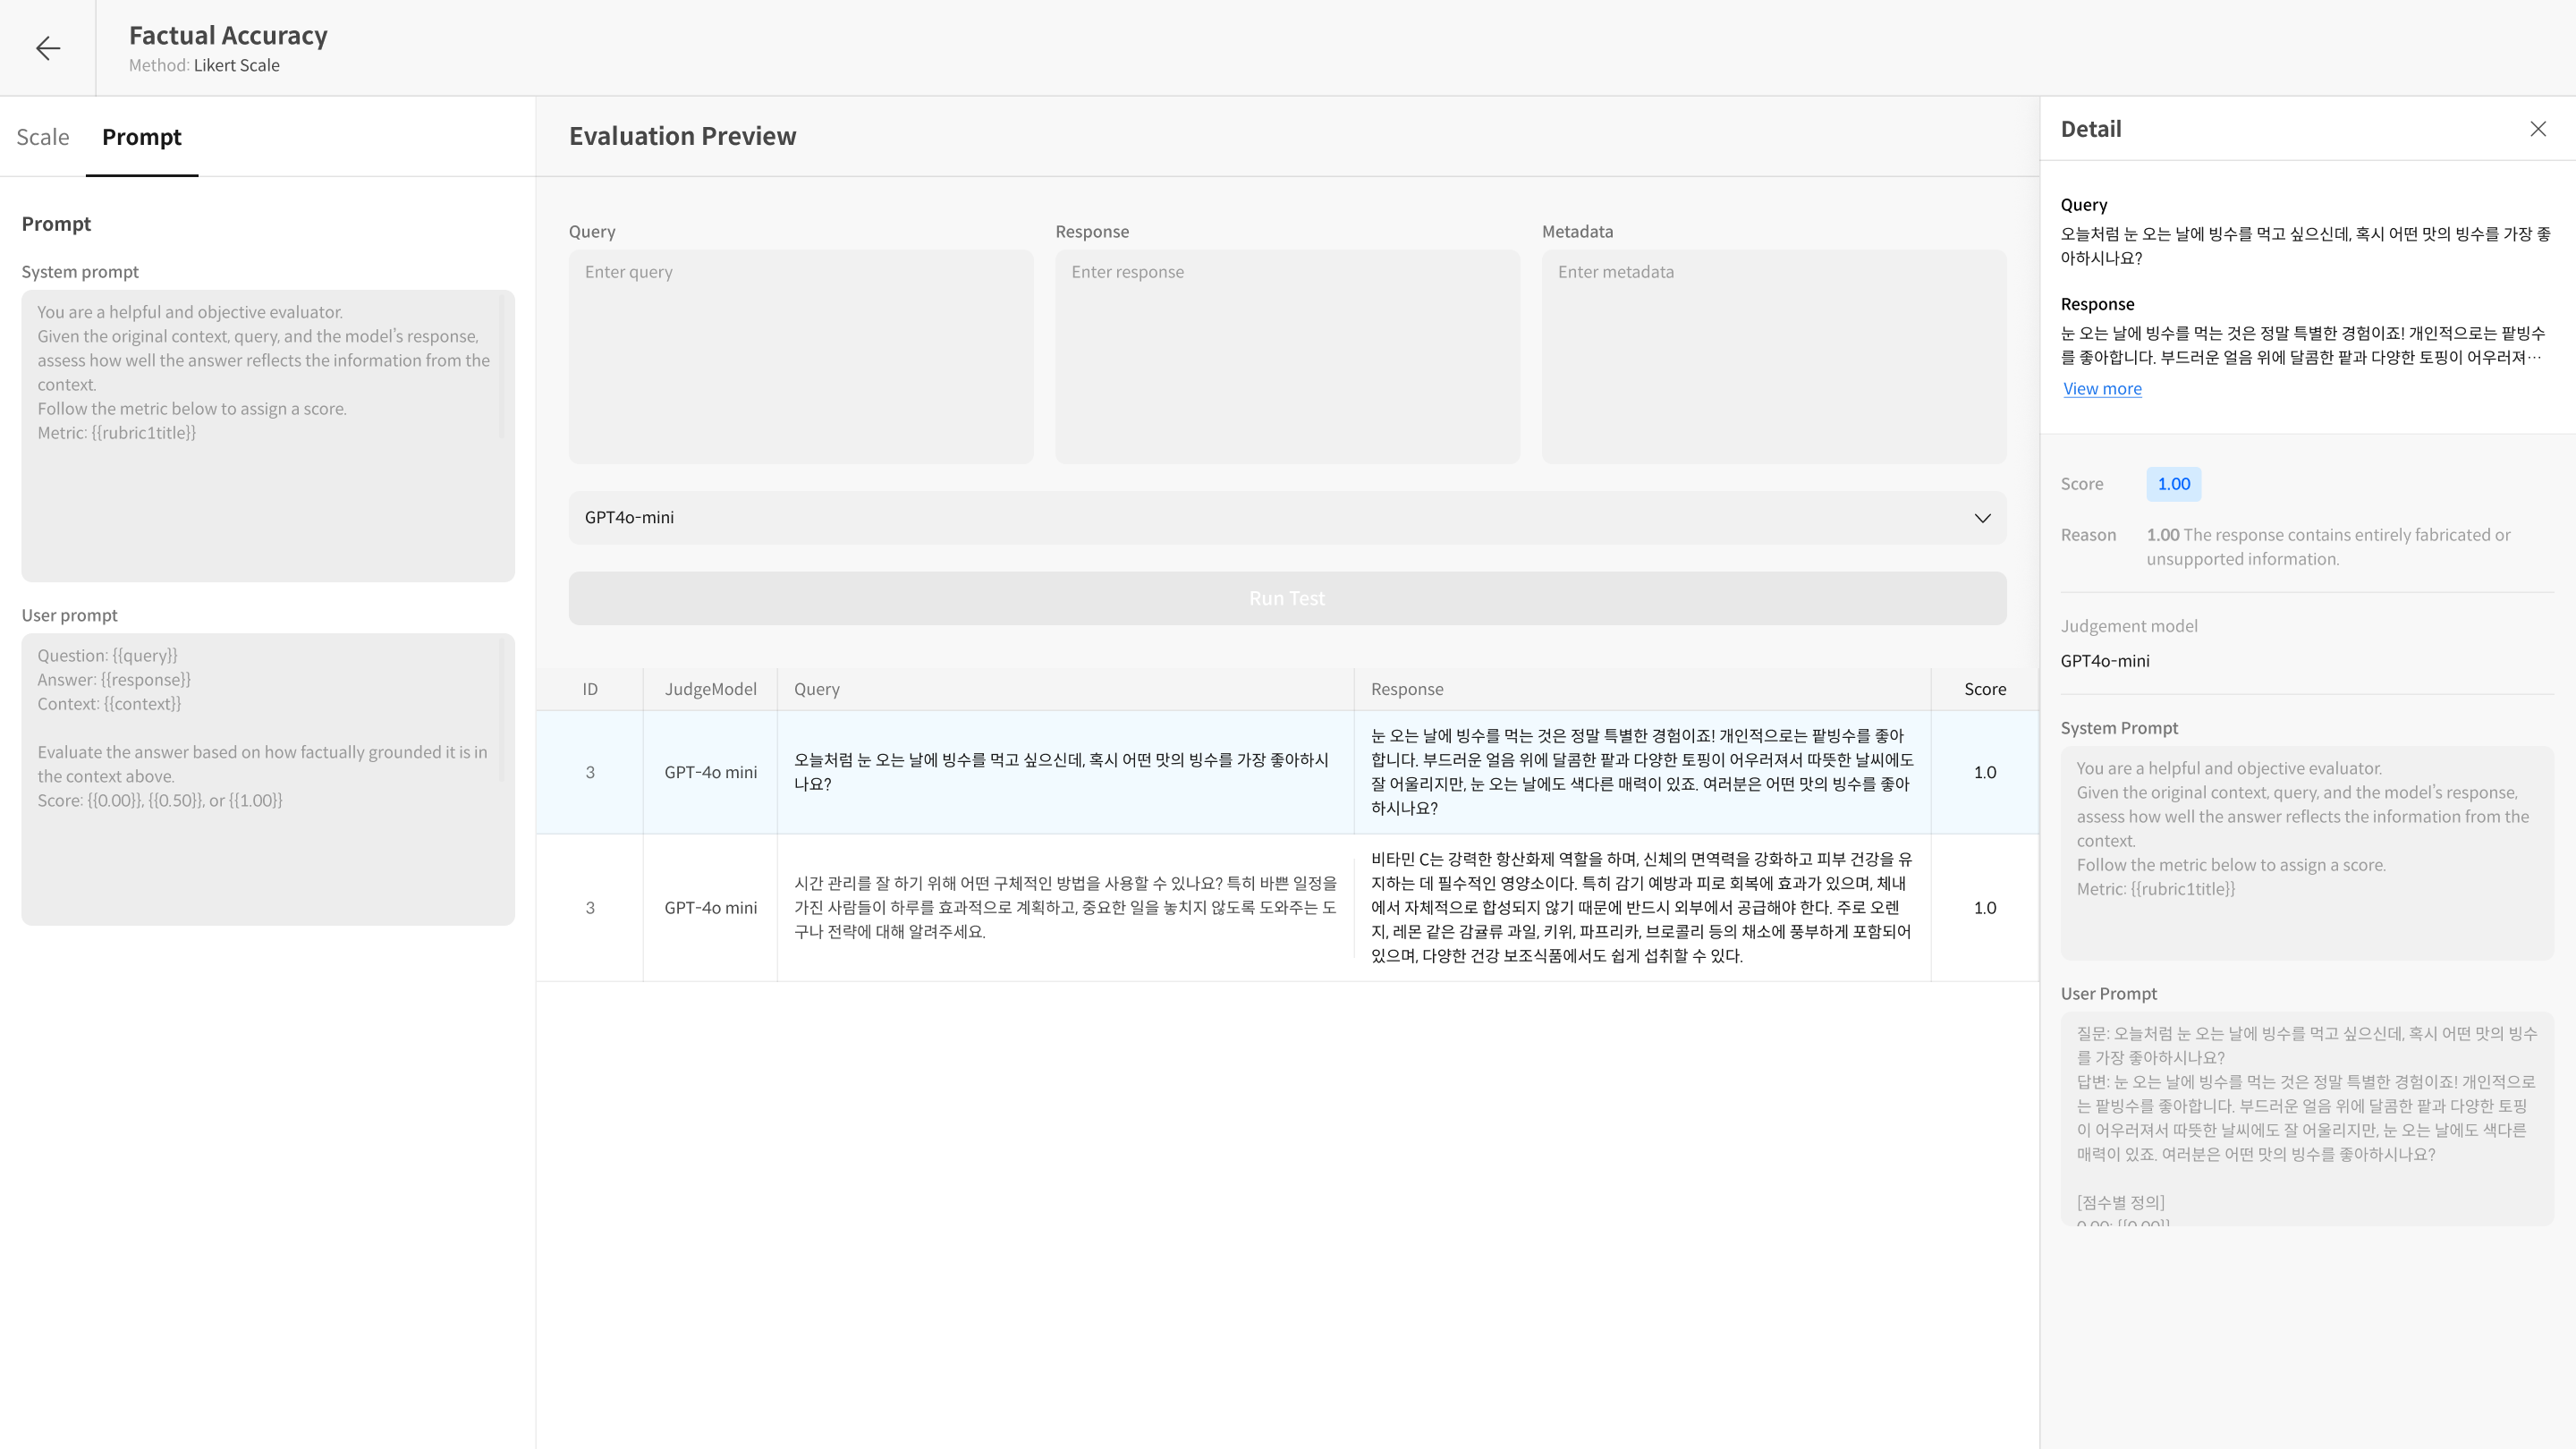
② Prompt Tab Detailed Explanation
In the Prompt tab, you can directly write the System Prompt that the evaluation model (Judge Model) will use to evaluate responses, and the User Prompt containing the actual evaluation instructions to be sent to the model.
-
System Prompt The area defining what role and perspective the evaluation model should use to perform evaluations. This is an important setting that specifies the model's persona and the direction of judgment criteria.
[System Prompt Input Fields Explanation]
- Role Definition Describe what perspective, rules, and attitude the evaluation model should use to perform evaluations. Example: Role instructions for fairness, objectivity, adherence to specific criteria, etc.
- No Need to Write Output Format Do not write output format separately in the System Prompt. The output format is automatically generated by the system and cannot be modified.
- Reflection Location and Priority The System Prompt is delivered to the model first when evaluation is requested, and is applied with higher priority than the User Prompt. Therefore, it becomes the criterion that determines the model's overall behavioral principles.
- Example
You are a fair and objective AI assistant, designed to evaluate text based on a given set of criteria.
-
User Prompt The area containing the query, model response, evaluation criteria (desc), etc. used when performing actual evaluation. Use template variables in
{{variable_name}}format to reflect dataset values in the prompt.[User Prompt Input Fields Explanation]
-
Role The User Prompt is the core area that delivers the data and evaluation criteria that the evaluation model must actually judge. Values like Query, Response, Rubric are set here, and are input directly to the model when the Evaluation Task runs.
-
Required Input Variables The following variables must be included in all evaluations.
{{query}}: The question data to be evaluated{{response}}: The model's response to evaluate{{desc}}: Rubric (evaluation criteria) automatically generated based on the Prompt Description
-
Optional Input Variables Optional items whose inclusion varies by evaluation type.
{{context}}: Reference context used when generating the question{{retrieved_context}}: Retrieved documents or additional information in RAG-based evaluation
-
Reflection Method All variables use the column names from the dataset or system-provided reserved variable names as-is. Input values are automatically inserted into the variables located within the User Prompt sentence and delivered to the evaluation model.
-
Writing Example
### Instruction
Please evaluate the provided "Response to Evaluate" based on the "Query" and the "Evaluation Criteria (Rubric)". If "Retrieved Context" is available, consider it to assess for issues like hallucination.

### Query
{{query}}

### Retrieved Context
{{retrieved_context}}

### Response to Evaluate
{{response}}

### Evaluation Criteria (Rubric)
{{desc}}
-
-
Scale Prompt (Not Editable) The Scale Prompt is a read-only area that users do not write directly. The Prompt Description and score scale information entered in the Scale tab are bundled as the
{{desc}}variable, allowing you to verify the final form of how it's reflected in the User Prompt.[Scale Prompt Screen Component Explanation]
-
Auto-generated Area The Scale Prompt is not a space to write separately, but displays the rubric definitions (Prompt Description + Score Descriptions) entered in the Scale tab automatically combined by the system.
-
Non-editable Structure The Scale Prompt is a fixed area that cannot be edited to maintain consistency in the actual prompt structure. It only provides a viewing function, and all modifications must be made in the Scale tab.
-
Reflection Purpose This tab is used to verify the following:
- What rubric description is included in the desc variable
- What form the score-by-score scale descriptions are inserted into the User Prompt
- The final composition of the prompt to be delivered to the model during evaluation
-
Recommendation for Users Since the Scale Prompt is not editable, to change rubric content or descriptions, you must make modifications in the Scale tab and then verify the reflection in this screen.
-
3. Verify with Run Test
To check if the entered prompts work correctly, you can verify how they're actually input to the model in the Detail area after Run Test. Run Test is a function that tests your written metric to check whether the prompts and settings work as intended.
- You can check scores for each item along with applied prompt content and model reasoning.
- You can repeat testing while modifying prompts.
4. Save Prompt Settings
After completing prompt settings, you can save the metric and use it in actual evaluations. After saving, the created metric can be checked on the dashboard and reused in subsequent Evaluation Tasks.
Metric Management Features
When you select a created metric, you'll navigate to the detail page for that metric. On this page, you can use the following features:
- View Metric details
- Execute Preview Run Test
- Delete Metric
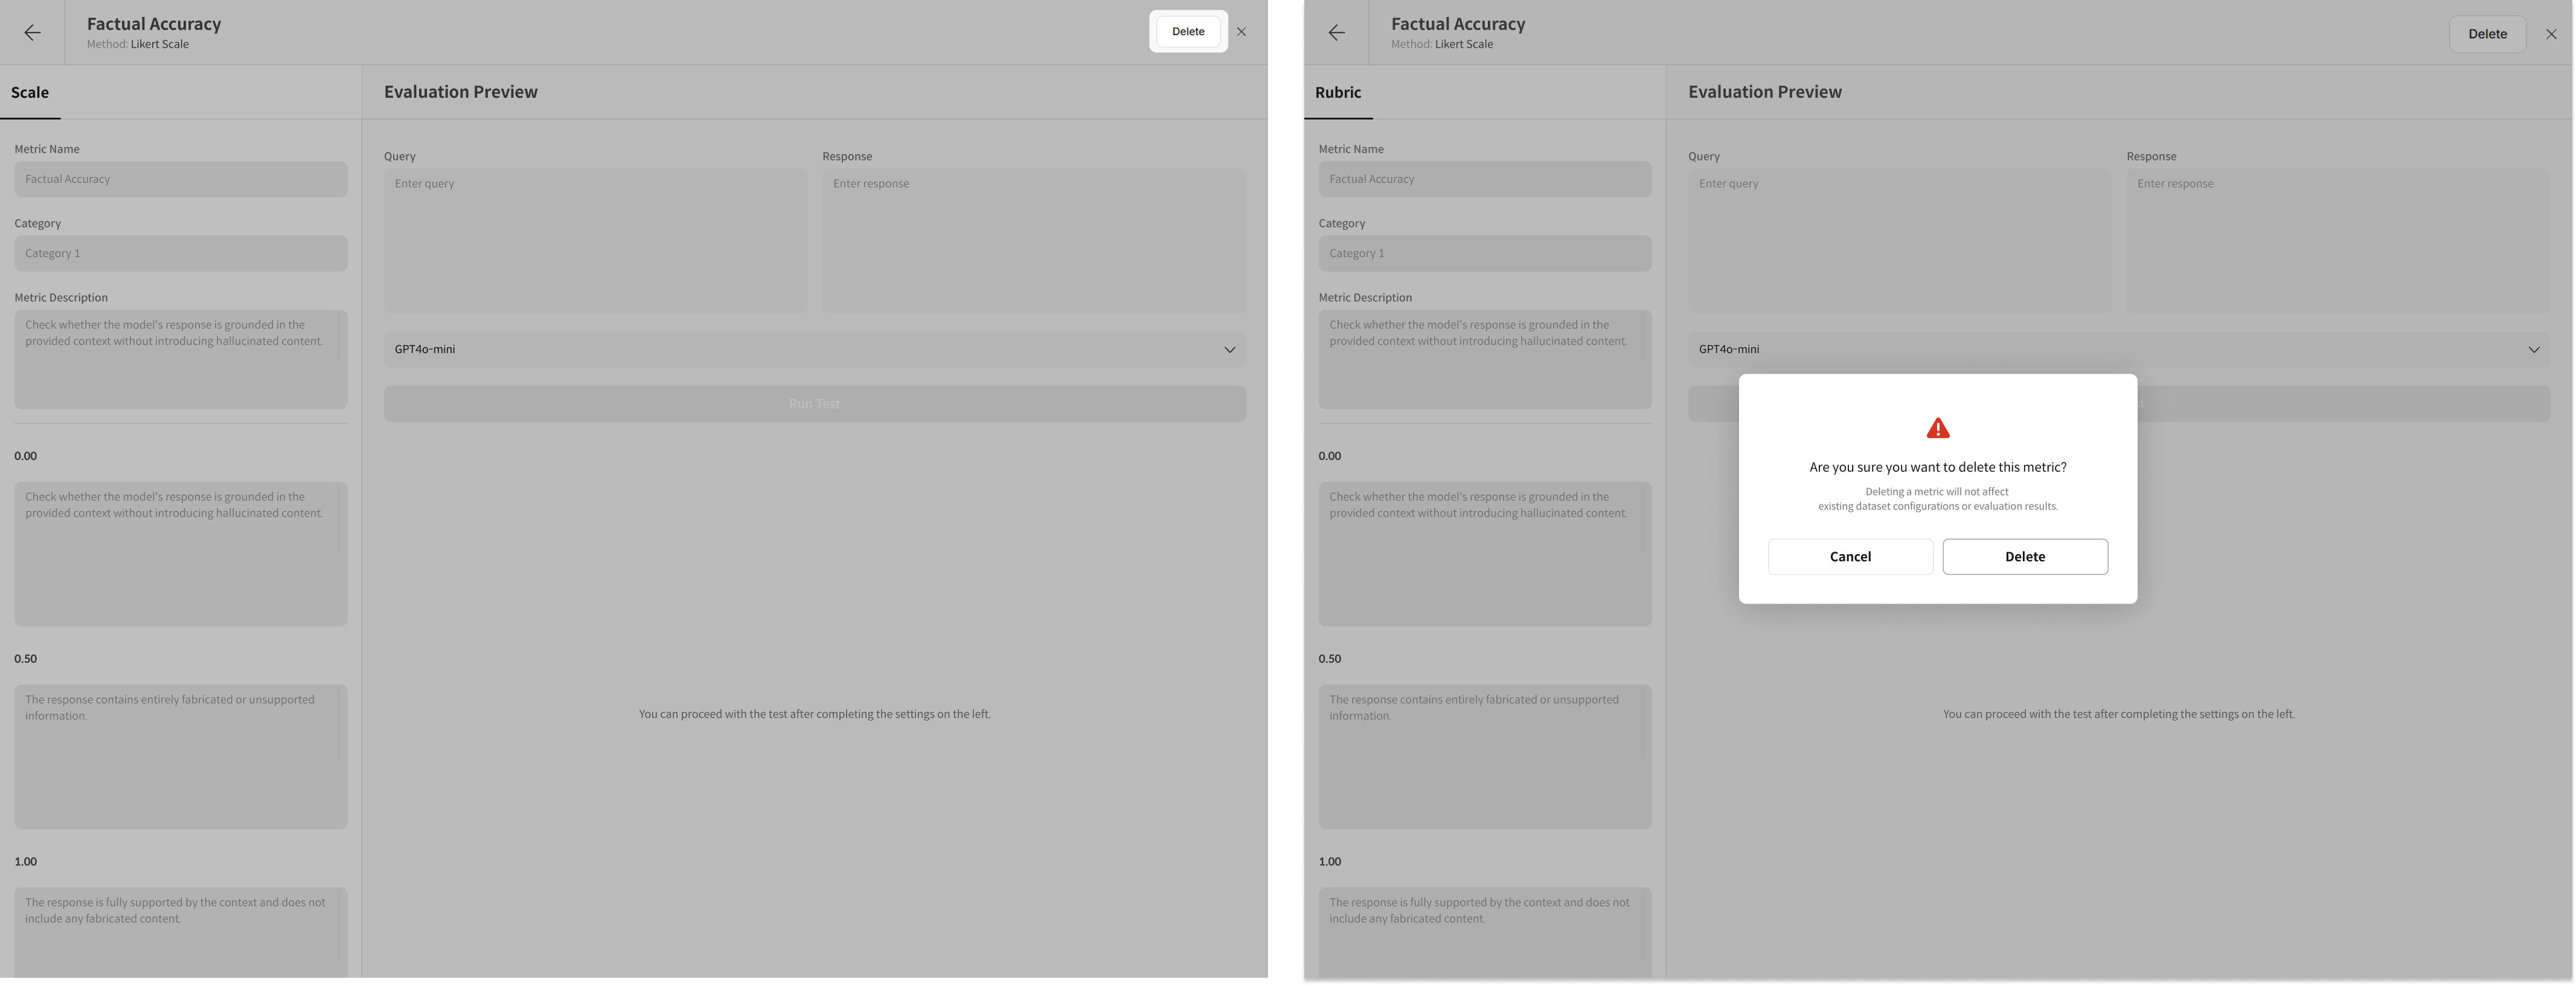
① Metric Detail Screen Guide
② Preview Run Test
You can run a preview evaluation (Preview Run) for each metric. You can verify test results before actual evaluation to check that the configured evaluation criteria work correctly.

- Before running Run Test, you must enter Metadata values in JSON format if necessary.
- You can apply your configured evaluation criteria to an actual model through Preview Run.
Evaluated data provides not only scores but also detailed evaluation reasons when you select the data.
③ Delete Metric
You can delete created metrics individually from the list. Deleted metrics cannot be recovered, but this does not affect results of evaluations that have already been performed.